
This is my go-to onion rings recipe for achieving that perfect, satisfyingly crunchy coating that actually sticks to the sweet, tender onion inside, just like you’d get at a classic American drive-in. With a few simple tricks I’ve perfected over the last 10 years, you’ll be making restaurant-quality onion rings right in your own kitchen. It’s a foolproof method that delivers that crispy, golden-brown perfection every single time.
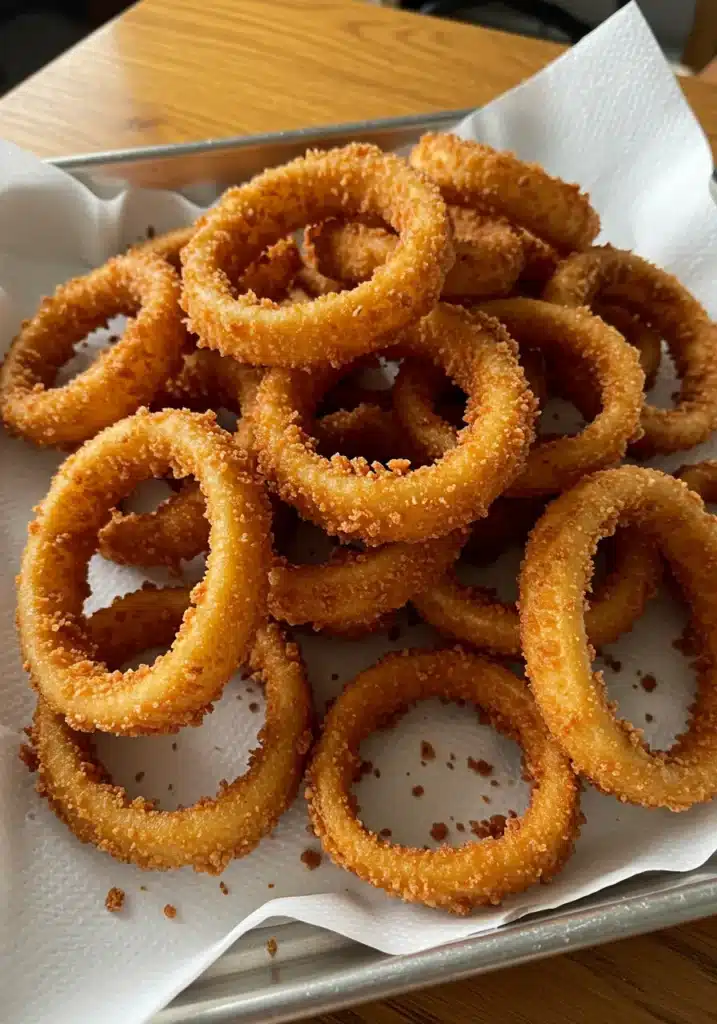
Hey friend! So glad you stopped by my kitchen today. Let’s talk about something truly magical: turning a simple onion into a pile of crispy, golden, can’t-stop-eating-them onion rings. Forget the frozen stuff—I’m going to show you how to make the real deal. It’s easier than you think!
Jump to Section
Key Takeaways
- Seriously Crispy: We’re using a special two-step coating process that guarantees a crunchy batter that won’t fall off. No more sad, soggy rings!
- Simple Pantry Ingredients: You probably have everything you need right now—flour, milk, an egg, and a few seasonings. It’s that easy.
- Crowd-Pleasing Favorite: These are perfect as a game-day appetizer, a side for burgers, or just a fun weekend snack. They disappear fast, so you might want to make a double batch!
- Quick and Easy: From start to finish, you can have a warm batch of these ready in under 30 minutes. They’re a fantastic appetizer to whip up alongside my cheesy spinach artichoke dip when company comes over.
Why You’ll Love This Onion Rings Recipe
- That Unbeatable Crunch: The combination of a thin batter and a panko coating gives you a light, airy, and super crispy texture that’s absolutely addictive.
- Sweet, Not Pungent: I’ll show you my trick for soaking the onions first, which makes them perfectly sweet and mild. It’s a total game-changer!
- The Batter STICKS: Say goodbye to the onion sliding out after one bite. This recipe ensures the coating hugs the onion perfectly.
- So Much Better Than Frozen: The fresh, homemade taste is worlds away from anything you can buy in a bag. Trust me on this one.
- Versatile and Fun: You can serve these as a side with almost anything, from a weeknight dinner of The Best Classic Meatloaf Recipe to a full-on party spread.
- Wholesome Ingredient Power: Onions are naturally packed with antioxidants and vitamin C, so you can feel pretty good about this tasty treat!
A Little Trip Down Memory Lane
I still remember the first time I had a truly great onion ring. It was at a little roadside diner on a family road trip through the Midwest when I was a kid. The air smelled of sizzling burgers, and these giant, golden rings were served in a red plastic basket lined with checkered paper. They were so different from the ones my mom bought from the freezer aisle—they were unbelievably crunchy, and the onion inside was so sweet and juicy.
That taste stuck with me. For years, I tried to recreate that perfect onion ring at home. My first few attempts were… well, let’s just say they were learning experiences! Sometimes the batter would be too thick; other times, it would slide right off in the hot oil. It took a lot of trial and error, but I finally cracked the code. This recipe is the result of all that experimenting. It brings me right back to that little diner and tastes just like my favorite comfort foods, like a big plate of Million Dollar Spaghetti. It’s pure, simple, and delicious nostalgia.
Ingredients for Homemade Onion Rings
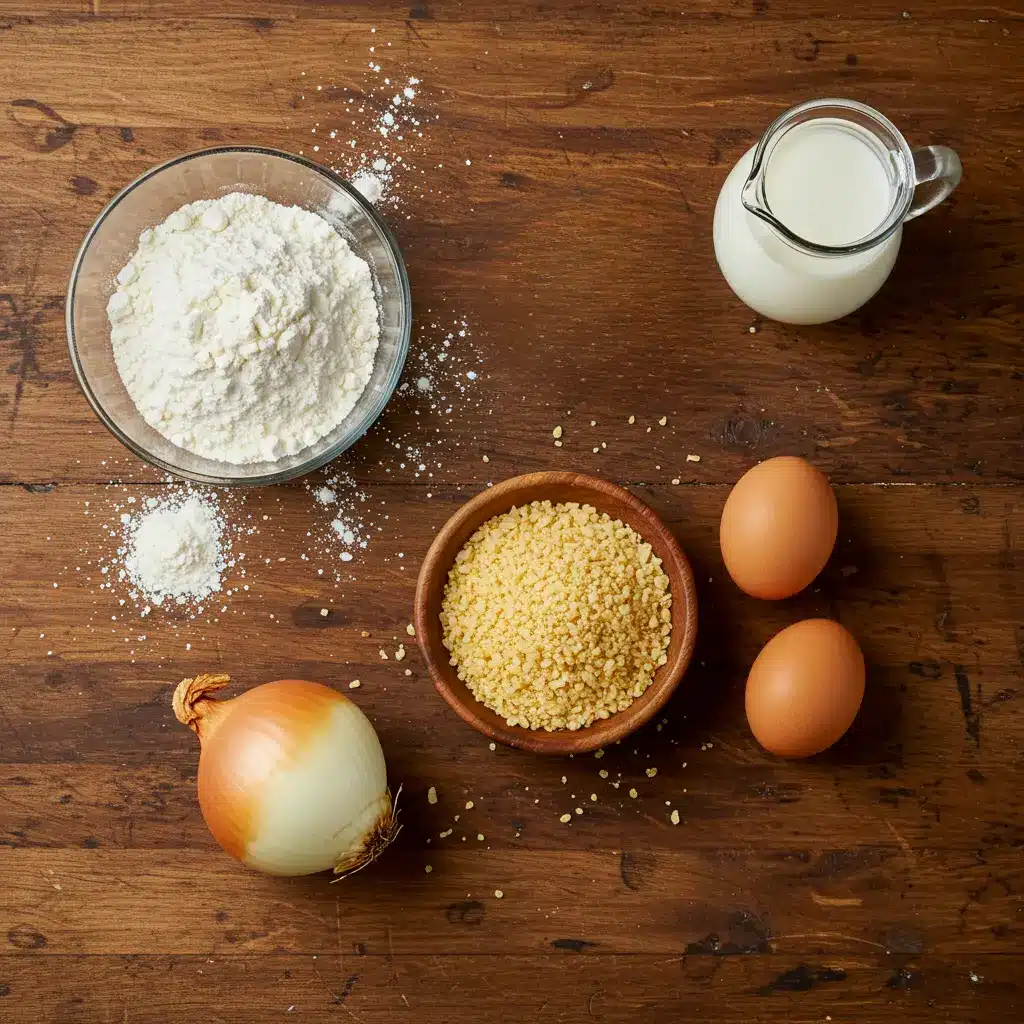
Here’s what you’ll need to make this onion rings recipe. The ingredients are simple, but the results are spectacular.
| Ingredient | Notes / Easy Substitutions |
|---|---|
| 1 large Sweet Onion (like Vidalia) | A yellow or white onion works too, but sweet onions give the best flavor! |
| 1 cup All-Purpose Flour | For a gluten-free version, use a 1-to-1 gluten-free baking flour blend. |
| 1 tsp Baking Powder | This is essential for a light and airy batter. Don’t skip it! |
| 1 tsp Salt | Fine sea salt is my go-to, but table salt works just fine. |
| 1 large Egg | This helps bind the batter together. |
| ¾ cup Milk | For a dairy-free option, you can use unsweetened almond or soy milk. For a classic flavor, try using beer! |
| 1 cup Panko Breadcrumbs | Panko gives the best crunch! In a pinch, regular breadcrumbs will work. |
| 3-4 cups Vegetable Oil | Canola, peanut, or any neutral oil with a high smoke point is perfect for frying. |
| Seasoned Salt (for serving) | A sprinkle right after frying adds the perfect finishing touch. |
This simple appetizer is a great lead-in to a hearty meal like my Creamy Oven-Baked Chicken Thighs.
Equipment Needed
- Large, Heavy-Bottomed Pot or Dutch Oven: This holds heat evenly, which is key for frying.
- Kitchen Thermometer: A candy or deep-fry thermometer is super helpful for keeping the oil at the right temperature.
- Slotted Spoon or Spider Strainer: For safely adding and removing the onion rings from the hot oil.
- Wire Cooling Rack: Placing the fried rings on a rack instead of paper towels keeps them from getting soggy.
- Shallow Bowls: You’ll need three for your breading station.
How to Make Onion Rings Step-by-Step
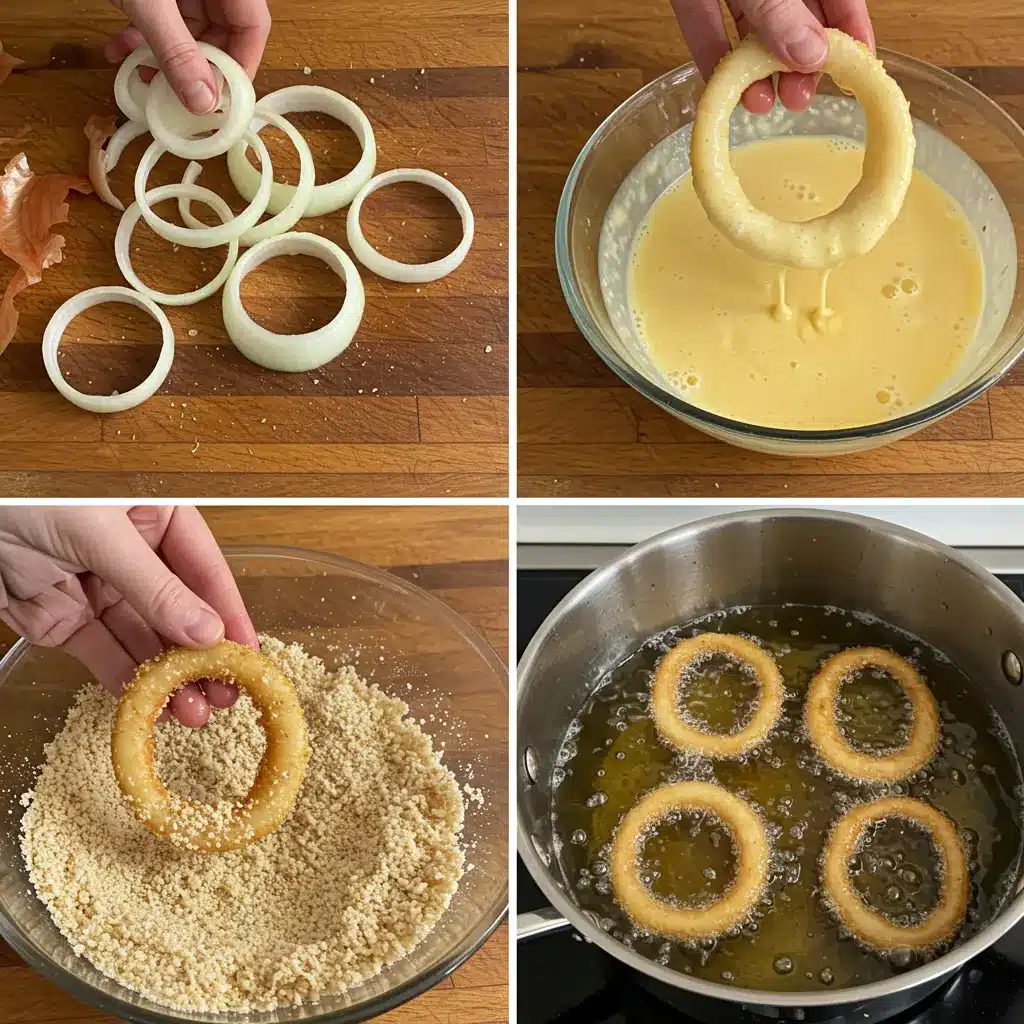
- Prep the Onions: Slice your onion into ½-inch thick rings and separate them. Place the rings in a large bowl and cover them with ice water. Let them soak for at least 20 minutes (or up to an hour). This little trick makes them milder and sweeter!
- Set Up Your Breading Station: While the onions soak, get three shallow bowls ready. In the first, mix the flour, baking powder, and salt. In the second, whisk the egg and milk together until smooth. In the third, pour in your panko breadcrumbs.
- Dry the Onions: Drain the onions completely and pat them thoroughly dry with paper towels. I mean it—get them super dry! This is the secret to making the batter stick.
- Coat the Rings: Now for the fun part! Working with one ring at a time, first dredge it in the flour mixture, tapping off the excess. Next, dip it into the egg wash, letting any extra drip off. Finally, press it firmly into the panko, making sure it’s coated all over. Place the coated ring on a baking sheet.
- Heat the Oil: Pour about 2-3 inches of oil into your Dutch oven and heat it over medium-high heat until it reaches 375°F. If you don’t have a thermometer, a crumb of panko should sizzle and turn golden in about 30 seconds.
- Fry to Golden Perfection: Carefully place a few onion rings into the hot oil, being sure not to overcrowd the pot. Fry for about 2-3 minutes per side, or until they are a deep golden brown and beautifully crispy. They’ll be irresistible, just like my Garlic Parmesan Cheeseburger Bombs!
- Drain and Season: Use a slotted spoon to transfer the fried rings to a wire rack. Immediately sprinkle them with seasoned salt while they’re still hot. This helps the seasoning stick. Repeat with the remaining rings.
My Expert Tips for the Best Results
- Don’t Skip the Soak! Seriously, soaking the onions in ice water is the secret to a sweet, non-bitter onion ring. It really makes a huge difference in the final flavor.
- Keep Your Oil Temperature Stable: This is so important! If the oil is too cool, the onion rings will absorb too much oil and get greasy. If it’s too hot, the outside will burn before the inside is cooked. Keep that thermometer handy.
- The Double Dredge is Your Friend: For an extra-thick and crunchy coating, you can dip the ring back in the egg wash and panko after the first coating. It’s a little extra work, but oh-so-worth-it.
- Don’t Overcrowd the Pot: Frying in small batches ensures the oil temperature doesn’t drop and that each ring has enough space to get crispy on all sides.
- Season Immediately: Get that salt on them the second they come out of the oil! The heat helps the seasoning adhere perfectly. It’s a small step that adds a big punch of flavor. It’s as important as the sauce on my Buffalo Chicken Wraps.
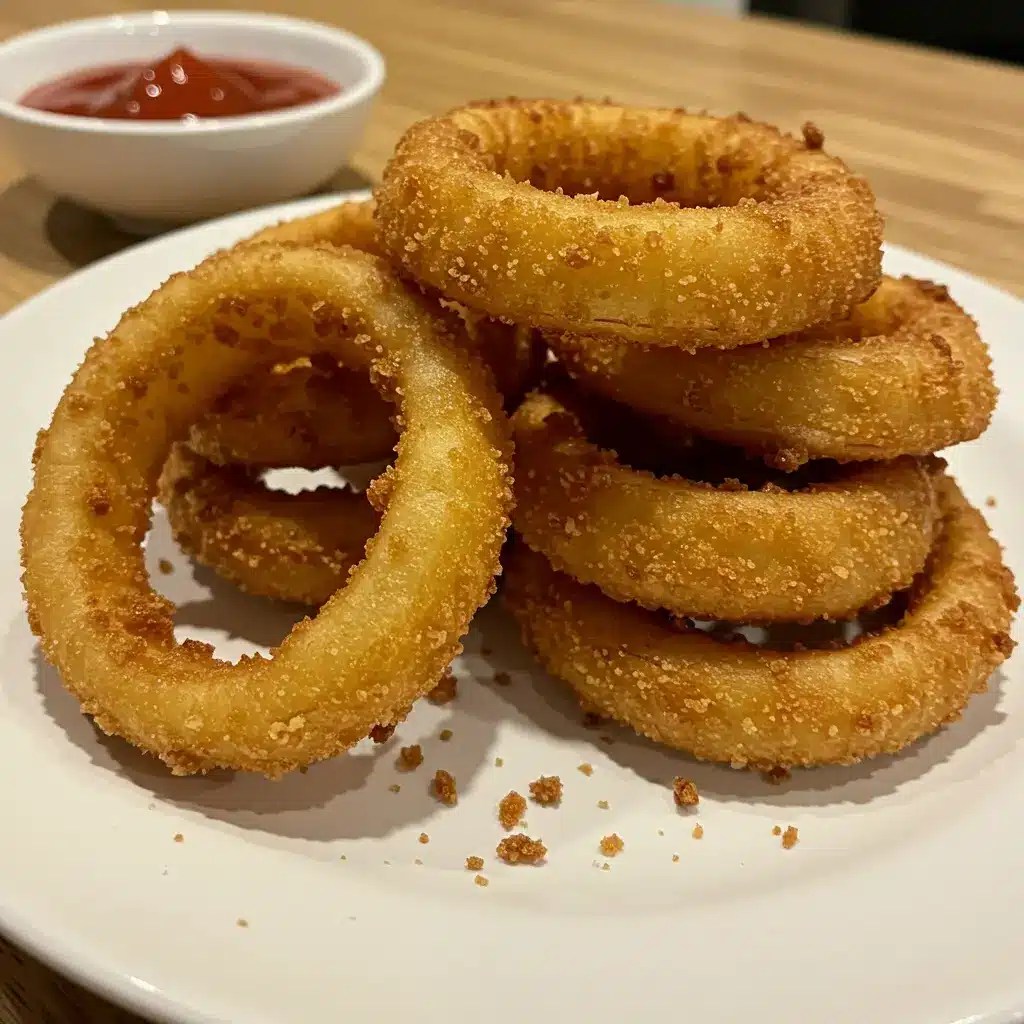
What to Serve With Onion Rings
These are amazing on their own, but they also make the perfect side dish!
- Classic Burgers: Is there a more iconic duo?
- Dipping Sauces: Serve them with ketchup, BBQ sauce, ranch, or a spicy aioli.
- Steak Dinner: They are absolutely heavenly next to some juicy Steak Bites with Garlic Butter.
- Sandwiches and Wraps: A crunchy side to your favorite lunch.
Storing and Reheating Tips
While onion rings are definitely best eaten fresh, you can store leftovers. Let them cool completely, then place them in an airtight container in the fridge for up to 2 days. To reheat, bake them at 375°F for 5–7 minutes or pop them in an air fryer until they’re hot and crispy again. Please, don’t microwave them unless you enjoy a soggy ring!
Nutrition Facts
Nutrition information is estimated for a single serving and may vary based on the specific ingredients and cooking methods used.
| Amount Per Serving | |
|---|---|
| Calories | 350 |
| Total Fat | 20g |
| Saturated Fat | 3g |
| Cholesterol | 30mg |
| Sodium | 650mg |
| Total Carbohydrate | 38g |
| Dietary Fiber | 3g |
| Total Sugars | 6g |
| Protein | 6g |
FAQs About This Onion Rings Recipe
Why do my onion rings get soggy?
This usually happens if your oil isn’t hot enough or if you let them sit on paper towels instead of a wire rack. Make sure your oil is at a steady 375°F, and let them drain on a rack to allow air to circulate.
What’s the best onion to use for this onion rings recipe?
I love using a sweet onion like a Vidalia because it gives you a sweet, mellow flavor without any harsh bite. But honestly, a good old yellow or white onion will also make a delicious batch of onion rings.
Can I make these in an air fryer?
Yes! Assemble the rings as directed, then arrange them in a single layer in your air fryer basket. Spray them with a little oil and cook at 375°F for about 10-12 minutes, flipping halfway through, until golden and crispy.
Final Thoughts
I really hope you love making this onion rings recipe as much as my family and I do. There’s just something so satisfying about making a restaurant favorite at home and having it turn out even better! It’s the perfect, fun cooking project for a lazy weekend.
When you make them, I’d love to see! Tag me on social media or leave a comment and a rating below. And if you’re looking for a show-stopping dessert to follow up this amazing appetizer, you have to try The Ultimate Easy Chocolate Fudge Cake!
Happy cooking!
Karen
Turn your feed delicious—follow us on Facebook & Pinterest.
Homemade Onion Rings Recipe
Ingredients
Method
- Prep and Soak Onions: Slice the onion into ½-inch thick rings and separate them. Place the rings in a large bowl and cover with ice water. Let them soak for at least 20 minutes (or up to an hour). This makes them milder and sweeter!
- Set Up Breading Station: While the onions soak, get three shallow bowls ready. In the first, mix the flour, baking powder, and salt. In the second, whisk the egg and milk together until smooth. In the third, pour in your panko breadcrumbs.
- Dry and Coat the Rings: Drain the onions completely and pat them thoroughly dry with paper towels. This is the secret to making the batter stick!
- Coat the Rings: Working with one ring at a time, first dredge it in the flour mixture, tapping off the excess. Next, dip it into the egg wash, letting any extra drip off. Finally, press it firmly into the panko, making sure it’s coated all over. Place the coated rings on a baking sheet.
- Heat the Oil: Pour about 2-3 inches of oil into a heavy-bottomed pot or Dutch oven and heat it over medium-high heat until it reaches 375°F (190°C).
- Fry to Golden Perfection: Carefully place a few onion rings into the hot oil, being sure not to overcrowd the pot. Fry for about 2-3 minutes per side, or until they are a deep golden brown and beautifully crispy.
- Drain and Season: Use a slotted spoon to transfer the fried rings to a wire rack. Immediately sprinkle them with seasoned salt while they’re still hot. Serve warm and enjoy!