
The One-Bite Truth
Pan de muerto is a traditional Mexican sweet bread made with orange zest and anise seeds, served during Día de Muertos to honor deceased loved ones.

But here’s what most recipes won’t tell you: the real magic isn’t just the flavor—it’s understanding why your dough is too dense, how to make it 4 weeks ahead, and which drink pairing actually prevents dryness.
Jump to Section
Key Takeaways
- Pan de muerto isn’t just dessert—it’s a spiritual offering placed on ofrendas (altars) as part of Día de Muertos traditions, making every loaf a bridge between the living and the dead.
- Dense, heavy bread? Most home bakers over-proof or use expired yeast. Our troubleshooting guide pinpoints exactly why your loaf flopped and how to fix it next time.
- Make it 4 weeks early. Freeze shaped dough unbaked, then bake fresh on any day you want—this strategy gives you the crispy crust and soft crumb that store-bought versions never deliver.
- Regional variations range from Oaxaca’s fancy pan de yema (with decorative faces) to Michoacán’s pan de hule (shiny “rubber” bread)—each tells a different story about pan de muerto’s evolution.
- Champurrado is the game-changer pairing. Unlike regular hot chocolate, this thick, masa-based drink dunks perfectly and masks any over-proofing flaws while complementing the orange-anise flavor.
- Try serving pan de muerto alongside your creamy Mexican street corn soup for an authentic Día de Muertos feast.
Why You’ll Love This Pan de Muerto
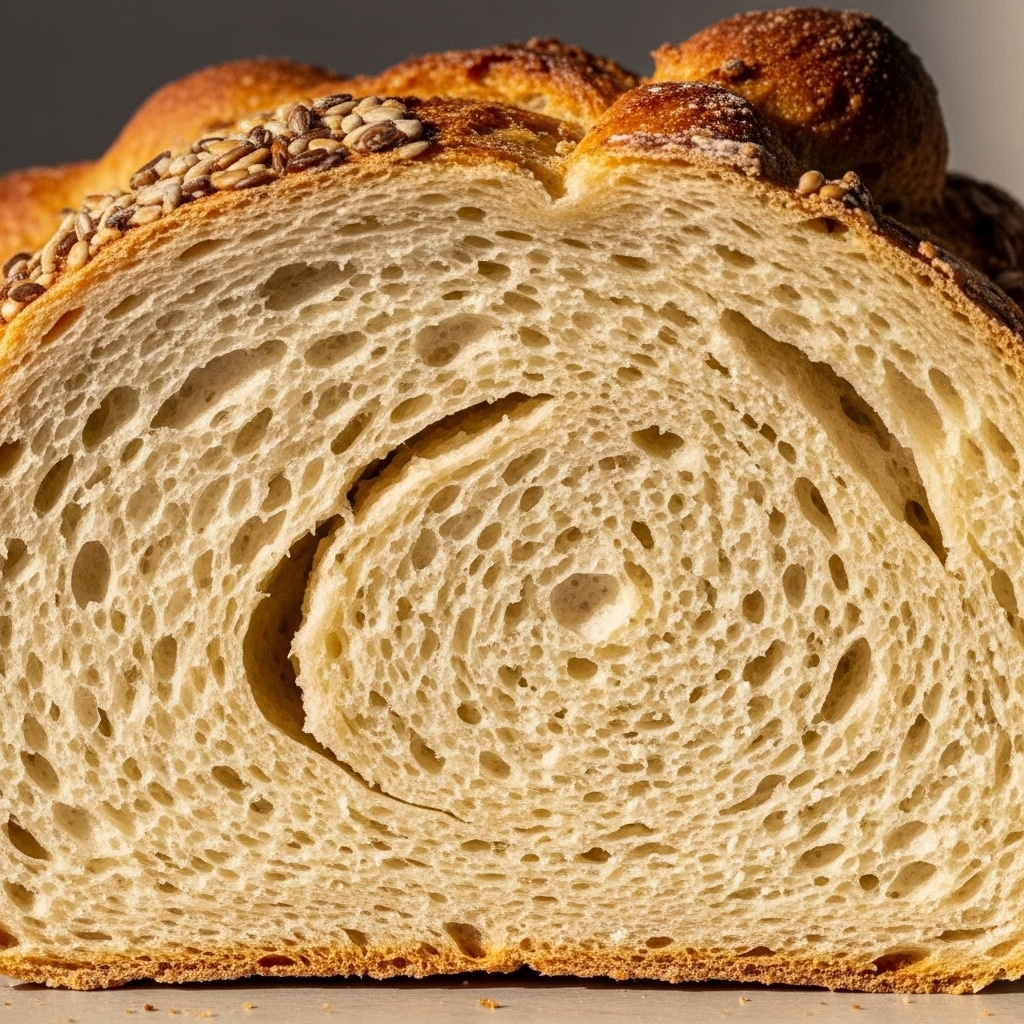
- Soft, pillowy crumb with a delicate citrus-anise flavor that tastes like home (or Mexico, if home is there).
- Showstopper presentation—those iconic crossed bone shapes and sugar coating look fancy but are easier to shape than you’d think.
- Your kitchen will smell incredible for hours—orange blossom and anise create an aroma that signals celebration.
- Moderately enriched dough means you don’t need professional baker skills; just patience and this guide’s troubleshooting section.
- Freezer-friendly confidence—make it weeks ahead and feel zero guilt about timing for Día de Muertos.
- Pairs perfectly with champurrado, atole, or café de olla—turning a simple breakfast into a cultural moment.
- Vegan and gluten-free options exist and actually taste good (more on that below).
Food and Cultural Background: The Spirit of Pan de Muerto
Pan de muerto’s roots run deep into Mexico’s soul—literally. The Aztecs baked offerings called pan de semilla made from amaranth during rituals honoring their gods. When Spanish colonizers arrived in the 16th century, they were horrified by human sacrifice and reimagined this bread using wheat flour and the baking techniques they’d brought from Spain. The result? A hybrid: European enriched dough meets Mesoamerican spiritual purpose.
Today, pan de muerto sits on every ofrenda (altar) during Día de Muertos, November 1st and 2nd. The bread isn’t just eaten—it’s an offering. Mexicans believe the aroma, or essence, of pan de muerto rises to the deceased as they journey back to visit the living. The skull-shaped top represents death without fear; the crossed bones symbolize the four cardinal directions of the Aztec calendar. Every element has meaning.
What I love about this tradition is its resistance to being “just a recipe.” In Mexico, pan de muerto vendors open their panadería doors in late September, and the bread sells out daily through early November. Families argue (lovingly) about whose abuela’s version is best. Oaxaca’s pan de yema is fancier than Mexico City’s classic round. Michoacán’s pan de hule is shiny and dark. Each region claims its version is the real pan de muerto.
The beauty? They’re all right. This bread belongs to everyone who honors their dead, and for many of us—even if we’re not Mexican—pan de muerto has become a way to mark the season, celebrate life’s sweetness, and remember that death isn’t the end; it’s just another door.
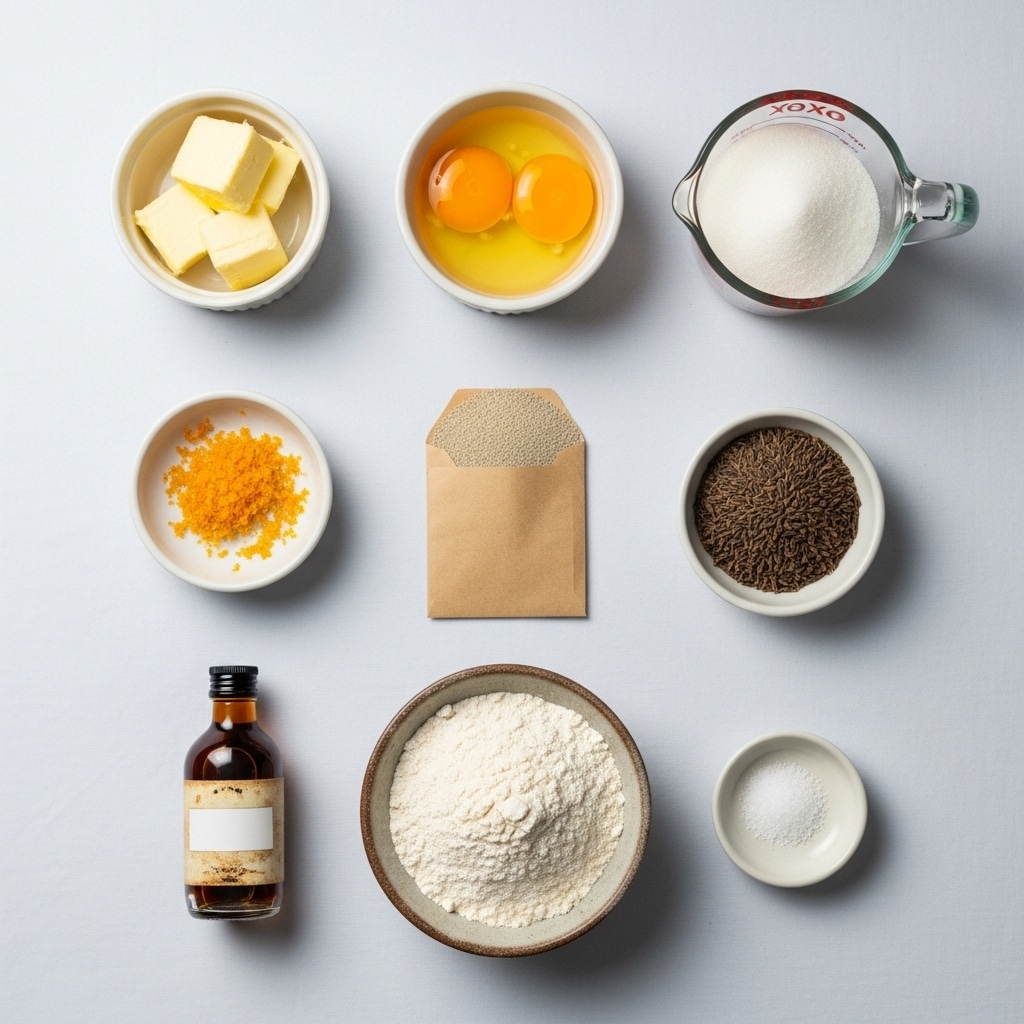
Ingredients for Authentic Pan de Muerto
| Ingredient | Quantity |
|---|---|
| All-purpose flour | 5–5½ cups (630–660g) |
| Granulated sugar | ¾ cup (150g), plus extra for topping |
| Active dry yeast | 2 teaspoons (7g) or 1 packet |
| Whole milk, warmed (110°F / 43°C) | ½ cup (120ml) |
| Large eggs | 4 whole eggs, plus 1 egg yolk for brushing |
| Unsalted butter, softened | ½ cup (115g) |
| Orange zest (fresh) | 2–3 tablespoons, or 1 teaspoon orange blossom water |
| Whole anise seeds | 1½–2 teaspoons |
| Vanilla extract | 1 teaspoon |
| Salt | ¾ teaspoon |
| Melted butter (for brushing, post-bake) | 2–3 tablespoons |
Notes: Orange zest is traditional; orange blossom water works if you can’t find fresh zest (but zest is superior). Store-bought orange zest from jars loses potency—fresh is 10x better. If using all-purpose flour over bread flour, your crumb will be softer (ideal for home bakers).
Equipment Needed
- Stand mixer with dough hook (or hand-mixing patience for 12 minutes)
- Large bowl for bulk fermentation
- Kitchen scale (highly recommended for accuracy)
- Instant-read thermometer (for milk temperature and proofing)
- Dutch oven or covered baking vessel (for steam, optional but improves crust)
- Bench scraper (keeps hands cleaner during shaping)
- Parchment paper
- Pastry brush (for egg wash and final butter glaze)
- Baking sheets or banneton baskets for proofing
How to Make Pan de Muerto: Step-by-Step
Step 1: Activate Your Yeast (5 minutes)
Pour the warm milk into a small bowl. Add yeast and 1 tablespoon sugar. Stir gently and let sit for 5 minutes. You’ll see foam form on top—this tells you yeast is alive. If nothing happens, your yeast is dead; start over with fresh yeast.
Why this matters: Dead yeast won’t rise, and you’ll end up with dense, brick-like bread. This is the #1 reason home bakers fail.
Step 2: Combine Wet Ingredients (3 minutes)
In a stand mixer bowl, beat together softened butter and remaining sugar until pale and fluffy (about 2 minutes). Add eggs one at a time, beating well after each. Stir in the yeast mixture, orange zest, anise seeds, vanilla, and salt. Mix until everything is evenly distributed—this is your flavor base.
Step 3: Build Your Dough (8 minutes)
Add flour gradually (start with 5 cups). Turn on the mixer with the dough hook at medium speed. Mix for 8–10 minutes until the dough pulls away from the bowl sides, appears smooth, and feels slightly tacky. If it’s too sticky, add flour 1 tablespoon at a time. If it’s too dry, add water 1 teaspoon at a time.
Critical troubleshooting point: Your dough should feel soft and supple, like a baby’s skin—not stiff. This enriched dough is meant to be a little loose. Over-mixing develops gluten unevenly and can cause cracks during baking.
Step 4: First Rise (Bulk Fermentation, 1.5–2 hours)
Oil a clean bowl. Transfer dough and cover tightly with plastic wrap or a damp towel. Place in a warm spot (68–72°F is ideal). Let rise until it doubles in volume, roughly 1.5 hours on a warm day, up to 2 hours on cooler days. You’ll know it’s ready when you poke it and the indentation springs back slowly but doesn’t disappear completely.
Make-ahead secret: If you need to freeze at this point, transfer the dough into a ziplock bag, flatten it, label with today’s date, and freeze up to 6 weeks. Thaw overnight in the fridge, then continue from Step 5.
Step 5: Shape Your Pan de Muerto (10 minutes)
Turn dough onto a lightly floured surface. Divide into two portions (for two medium loaves) or one large loaf. Set aside about 1/8 of the dough for the “bone” decorations.
Shaping technique: Form the main dough into a round. Place on a parchment-lined baking sheet. From the reserved dough, roll four “bones” (about pencil-thick, 4 inches long) and arrange them crossed on top. Shape a small ball and place it in the center (representing a skull or teardrop). This is what makes pan de muerto iconic—and it’s simpler than it sounds.
Step 6: Second Rise (1–1.5 hours)
Cover your shaped loaves with a damp towel. Let them rise in a warm spot until puffy and visibly larger, about 1 to 1.5 hours. They should look pillow-soft and feel airy when gently poked.
Why proofing is critical: Under-proofing = dense bread. Over-proofing = flat bread that doesn’t have oven spring. The sweet spot is when they look pillowy but spring back slowly.
Step 7: Egg Wash and Bake (30–40 minutes)
Preheat your oven to 350°F (175°C). Brush the risen loaves with egg yolk mixed with 1 tablespoon water. Bake on the middle rack for 30–40 minutes until golden-brown and the bottom sounds hollow when tapped.
Pro tip: Cover with aluminum foil during the last 10 minutes if the top browns too fast. Every oven is different.
Step 8: Sugar Glaze and Cool (15 minutes minimum)
Remove pan de muerto from the oven. While still warm, brush generously with melted butter. Sprinkle with granulated sugar (or colored sugar for festive appeal). Let cool on the baking sheet for at least 15 minutes before transferring to a wire rack.
Expert Tips for the Best Results: Troubleshooting & Regional Mastery
Why Your Pan de Muerto Flopped (And How to Fix It)
Dense, Heavy Loaf?
- Root cause #1: Over-proofing. If your second rise went past 1.5 hours, the yeast over-fermented and produced too much gas too early. Next time, proof for exactly 60–75 minutes.
- Root cause #2: Expired yeast. Always check your yeast date. Yeast older than 6 months loses potency, even if unopened.
- Root cause #3: Not enough salt. Salt regulates fermentation. If you accidentally skipped it, your dough ferments too fast, producing a dense crumb. Salt matters.
- Fix: Use a kitchen scale to measure ingredients precisely. Temperature control (aim for 70–72°F during proofing) is everything.
Sticky Dough That Won’t Hold Shape?
- Your hydration is too high. Add 1 tablespoon flour at a time during mixing until the dough pulls away from the bowl.
- Your room is too warm. If it’s above 75°F, your dough ferments faster and gets stickier. Try proofing in a cooler room or use cooler milk (90°F instead of 110°F).
- Fix: After the first rise, refrigerate the shaped dough for 30 minutes before baking. This firms everything up and makes the next rise predictable.
Bread Doesn’t Rise During Second Proof?
- Your oven might be too cold. Shaped dough needs 68–72°F to proof. Place it in a turned-off oven with the light on, or use a proofing box.
- Your yeast died (see: dense loaf section).
- Fix: Use an instant-read thermometer to verify your environment. If it’s below 65°F, your rise will stall.
Cracked Tops During Baking?
- Oven temperature too high or heat source too close. Lower your rack position or reduce temperature to 325°F.
- Not enough steam. Place a baking vessel filled with hot water on the lower rack during the first 15 minutes of baking. This creates humidity that lets the loaf expand gently.
- Dough was over-proofed before baking. Next time, aim for 60–75 minutes on the second rise, not 90+.
- Fix: Cover with foil and reduce heat to 325°F. Your loaf will take 40–45 minutes instead of 30–40, but the crust will be more tender.
8 Regional Variations Across Mexico (Why Your Favorite Might Not Be “Classic”)
Pan de muerto changes dramatically across Mexico’s regions. Here’s what makes each version special:
Mexico City & Central Mexico: The Classic Round
- Signature: Perfectly round loaf with four crossed bones and a centered “skull” ball. Light sugar coating, pale golden crust.
- Flavor: Orange zest + anise seeds, lightly spiced.
- Why: This is the “standard” because Mexico City dominates media and commerce. If you’ve seen pan de muerto in U.S. stores, it’s usually this version.
- Best for: First-timers; this is the foolproof recipe above.
Oaxaca: Pan de Yema (Egg Yolk Bread)
- Signature: Richer, more custardy crumb. Often decorated with decorative faces drawn in dough or icing—not just bones.
- Flavor: Heavy on egg yolks (sometimes 6–8), subtle anise, less orange emphasis.
- Why: Oaxaca has a centuries-old bakery tradition. Pan de yema is their pride.
- Best for: Advanced bakers who want richness.
Michoacán: Pan de Hule (“Rubber Bread”)
- Signature: Glossy, shiny crust (almost lacquered). Dark golden-brown. Named for its rubber-like appearance.
- Flavor: More caramelized, slightly less sweet than classic versions.
- Why: Baked with steam and special glazing techniques.
- Best for: Readers who want visual impact.
Yucatán: Pan de Muerto with Achiote
- Signature: Faintly pink or orange crust from annatto (achiote) spice.
- Flavor: Orange + anise + achiote’s earthy peppery notes.
- Why: Reflects Yucatán’s distinct culinary identity.
- Best for: Adventurous cooks.
Puebla: Pan de Muerto with Sesame
- Signature: Sprinkled with sesame seeds instead of (or in addition to) sugar.
- Flavor: Nuttier undertone from sesame.
- Why: Sesame is a Puebla staple.
- Best for: Those who want textural contrast.
San Andrés Mixquic: Despeinadas (“Unkempt Bread”)
- Signature: Donut-shaped or pretzel-shaped, generously sprinkled with red or pink sugar.
- Flavor: Similar to classic, but the shape means more crispy edges.
- Why: Local tradition dating back generations.
- Best for: Those who want crunch.
Guanajuato: Pan de Muerto con Chocolate
- Signature: Embedded with dark chocolate pieces inside.
- Flavor: Orange + anise + chocolate surprise.
- Why: Reflects Mexican chocolate traditions.
- Best for: Chocolate lovers.
Lesser-Known Gem: Pan de Muerto en Barra (Bread Bar)
- Signature: Baked as a flat sheet, cut into rectangles instead of round loaves.
- Flavor: Classic.
- Why: Easier to portion and sell at bakeries.
- Best for: Large families; less intimidating shape.
Tip: If traveling to Mexico during Día de Muertos (November), ask locals which regional version is “theirs.” You’ll taste the pride—and probably get an invitation to an ofrenda.
Make-Ahead Pan de Muerto: Your Strategic Timeline
Freezing Shaped Dough (4 Weeks Ahead)
- After shaping (Step 5), place on a parchment-lined baking sheet.
- Freeze uncovered for 2 hours until solid.
- Transfer to ziplock bags or wrap tightly in plastic wrap. Label with date.
- When ready to bake: Thaw overnight in the fridge. Let come to room temperature (1–1.5 hours), then proceed to egg wash and bake. Baking time may extend to 35–45 minutes since the dough is colder.
Freezing Fully Baked Loaves (2 Weeks Ahead)
- Bake completely and cool.
- Before sugaring: Freeze on a sheet, then transfer to ziplock bags.
- To refresh: Thaw at room temperature (2–3 hours), then brush with melted butter and sugar again. Optional: Warm in a 300°F oven for 5 minutes to restore aroma and crumb tenderness.
Room Temperature Storage (3 Days Ahead)
- Cool completely after baking.
- Wrap tightly in plastic wrap or store in an airtight container.
- Keeps for 3–4 days at room temperature, up to 5 days in a cool pantry.
- Tip: Store with an extra copy of my traditional bread pudding recipe—stale pan de muerto makes legendary bread pudding.
Best Drinks to Pair with Pan de Muerto
Champurrado (Thick Mexican Hot Chocolate)
Why it works: Champurrado is made with masa (corn flour), Mexican chocolate, cinnamon, and a touch of piloncillo (unrefined sugar). It’s thicker than regular hot chocolate—almost gravy-like. This thickness is perfect for dunking because it clings to the bread without making it soggy. The chocolate richness masks over-proofing flaws, and the spice doesn’t compete with orange-anise.
Quick recipe: Whisk 3 tablespoons masa harina into 1 cup cold milk. Heat 3 more cups milk with 1 cinnamon stick, 2 tablespoons piloncillo, and 2 ounces Mexican chocolate (tablet form). Slowly whisk in the masa mixture. Simmer for 5 minutes, stirring constantly. Serve warm.
Café de Olla (Mexican Spiced Coffee)
Why it works: Brewed in a clay pot with cinnamon, piloncillo, and sometimes star anise, café de olla is aromatic and only mildly sweet. The coffee’s acidity cuts through the bread’s richness without competing for flavor.
Quick recipe: Brew strong coffee (8 oz) with 1 cinnamon stick, 1 tablespoon piloncillo, and a pinch of whole cloves. Strain and serve warm in clay mugs if you have them.
Mexican Hot Chocolate (Chocolate Mexicano)
Why it works: Rich, frothy, and often spiced with cinnamon and sometimes almonds. It’s more indulgent than champurrado but pairs beautifully with lighter pan de muerto versions (like Mexico City’s classic).
Atole (Corn-Based Warm Drink)
Why it works: Lighter than champurrado, atole is made with masa and milk, flavored with vanilla or cinnamon. It’s perfect for morning, less heavy than chocolate versions.
Storing and Reheating Tips
Room Temperature: Wrap cooled pan de muerto tightly in plastic wrap or store in an airtight container. Keeps for 3–4 days.
Refrigerator: Not recommended; cold accelerates staling. Use the freezer instead.
Freezer: Fully baked, cooled loaves keep for up to 6 weeks. Thaw overnight in the fridge or at room temperature (2–3 hours). To restore softness and aroma, brush with melted butter and warm in a 300°F oven for 5–10 minutes.
Stale Bread Solution: Cube stale pan de muerto and make bread pudding (try my pastina soup logic: repurpose and reimagine). You’ll love the anise-orange notes in a custard base.
Nutrition Facts
Per serving (1 slice, roughly 2 oz / 57g)
| Nutrient | Amount |
|---|---|
| Calories | 180–210 |
| Total Fat | 5–6g |
| Saturated Fat | 3g |
| Cholesterol | 35mg |
| Sodium | 120mg |
| Total Carbohydrates | 30–32g |
| Dietary Fiber | <1g |
| Sugars | 12–14g |
| Protein | 3–4g |
Disclaimer: Nutrition values are estimates based on standard ingredient measurements. Actual values vary based on size of each slice and substitutions. This bread is enriched and moderately sweet—a special-occasion treat, not an everyday staple.
Vegan & Gluten-Free Options
Vegan Pan de Muerto:
- Replace 4 eggs with 1 cup unsweetened applesauce + 1 teaspoon xanthan gum (binds like eggs).
- Replace ½ cup butter with coconut oil or vegan butter.
- Egg wash: Use aquafaba (liquid from canned chickpeas) mixed with 1 tablespoon water.
- Result: Slightly denser crumb, but the flavor is nearly identical.
Gluten-Free Pan de Muerto:
- Use a 1:1 gluten-free flour blend (with xanthan gum already included) instead of all-purpose flour.
- Reduce liquid slightly (GF flour absorbs differently). Start with ½ cup milk instead of ½ cup + more.
- Expect a tighter crumb and slightly less height. (This is normal and delicious.)
- Result: Tasty but requires more precision.
FAQs About Pan de Muerto
Can I Make Pan de Muerto Without Orange?
Yes. Replace orange zest with 1 teaspoon orange blossom water, lemon zest, or even a pinch of rum extract. Anise is the non-negotiable flavor—that’s the soul of the bread.
Why Does My Pan de Muerto Taste Eggy?
Too many eggs or over-baking can amplify egg flavor. Stick to the recipe’s 4 whole eggs + 1 yolk (not more). Bake at 350°F for exactly 30–40 minutes, no longer.
Can I Use Instant Yeast Instead of Active Dry?
Yes. Use the same measurement. Instant yeast is finely ground and hydrates faster, but the ratio is 1:1.
What If I Don’t Have Anise Seeds?
Anise is traditional and adds the signature licorice note. However, if unavailable, try fennel seeds (similar flavor) or simply omit and increase orange zest to 3½ tablespoons. The bread won’t be “authentic,” but it’ll still taste good.
How Do I Know If My Dough Is Proofed Correctly?
Poke the dough gently with your finger. If the indentation springs back completely and quickly, it’s under-proofed. If it springs back slowly and mostly stays, it’s perfectly proofed. If it doesn’t spring back at all, it’s over-proofed.
Can I Bake This in a Dutch Oven?
Absolutely. Dutch ovens trap steam, creating a crispier crust and better oven spring. Bake at 350°F covered for 25 minutes, then uncovered for 10–15 minutes until golden.
Why Is My Pan de Muerto Dry?
Three reasons: (1) Over-baking—stick to 30–40 minutes max. (2) Not serving with a beverage—pan de muerto needs dunking or sipping. (3) Storing in the fridge instead of the freezer or counter—cold accelerates staling. Serve with champurrado or atole, and it’ll feel creamy and perfect.
Do I Have to Decorate It With Bones?
No. Pan de muerto is beautiful plain. The crossed-bone decoration is traditional but optional. Shape it as a simple round if you prefer.
Final Thoughts
Pan de muerto isn’t just a recipe—it’s a conversation with tradition, a way to honor those we’ve loved, and a reminder that sweetness and celebration are acts of love. Whether you’re baking it for Día de Muertos, a cultural celebration, or simply because your kitchen deserves to smell like orange and anise, this bread connects you to centuries of Mexican heritage.
The troubleshooting section above exists because I want you to succeed on your first try. Baking is science and patience. Dense bread doesn’t mean failure—it means your next loaf will be even better. Freeze a batch 4 weeks ahead, serve it with champurrado at a quiet breakfast, and notice how this bread tastes like ritual, memory, and home.
And if you love this recipe, pair your pan de muerto meal with my chicken enchilada casserole for an unforgettable Día de Muertos spread. Your table will feel authentic, warm, and full of gratitude.
¡Que descanses en paz, pan de muerto. You’re about to be legendary in my kitchen.
What’s your pan de muerto tradition? Drop a comment below—I’d love to hear how you celebrate Día de Muertos.
Your next favorite meal is waiting — follow us on Facebook & Pinterest.

Why Your Pan de Muerto Is Dense (And How One Baker Fixed It)
Ingredients
Method
- Activate Your Yeast: Pour warm milk into small bowl. Add yeast and 1 tablespoon sugar. Stir gently and let sit for 5 minutes. You should see foam form on top—this means yeast is alive. If nothing happens, yeast is dead; start over with fresh yeast.
- Combine Wet Ingredients: In stand mixer bowl, beat softened butter and remaining sugar until pale and fluffy (about 2 minutes). Add eggs one at a time, beating well after each. Stir in yeast mixture, orange zest, anise seeds, vanilla, and salt. Mix until evenly distributed.
- Build Your Dough: Add flour gradually (start with 5 cups). Mix on medium speed for 8-10 minutes until dough pulls away from bowl sides, appears smooth, and feels slightly tacky. Add flour 1 tablespoon at a time if too sticky.
- First Rise (Bulk Fermentation): Oil a clean bowl. Transfer dough and cover tightly with plastic wrap or damp towel. Place in warm spot (68-72°F ideal). Let rise until doubled in volume, roughly 1.5 hours on warm day, up to 2 hours on cooler days. Poke test: indentation springs back slowly but doesn’t disappear completely = ready.
- Shape Your Pan de Muerto: Turn dough onto lightly floured surface. Divide into two portions (for two medium loaves) or one large loaf. Set aside about 1/8 of dough for bone decorations. Form main dough into round. Place on parchment paper. From reserved dough, roll four bones (about pencil-thick, 4 inches long) and arrange crossed on top. Shape small ball and place in center.
- Second Rise: Cover shaped loaves with damp towel. Let rise in warm spot until puffy and visibly larger, about 1 to 1.5 hours. They should look pillow-soft and feel airy when gently poked.
- Egg Wash and Bake: Preheat oven to 350°F (175°C). Brush risen loaves with egg yolk mixed with 1 tablespoon water. Bake on middle rack for 30-40 minutes until golden-brown and bottom sounds hollow when tapped. Cover with foil during last 10 minutes if browning too fast.
- Sugar Glaze and Cool: Remove pan de muerto from oven. While still warm, brush generously with melted butter. Sprinkle with granulated sugar (or colored sugar). Let cool on baking sheet for at least 15 minutes before transferring to wire rack.