This Greek Yogurt Chicken Enchilada Bake is a lighter, high-protein dinner that layers tender shredded chicken, corn tortillas, and a tangy green chili yogurt sauce for a creamy, bubbly meal without the heavy cream.
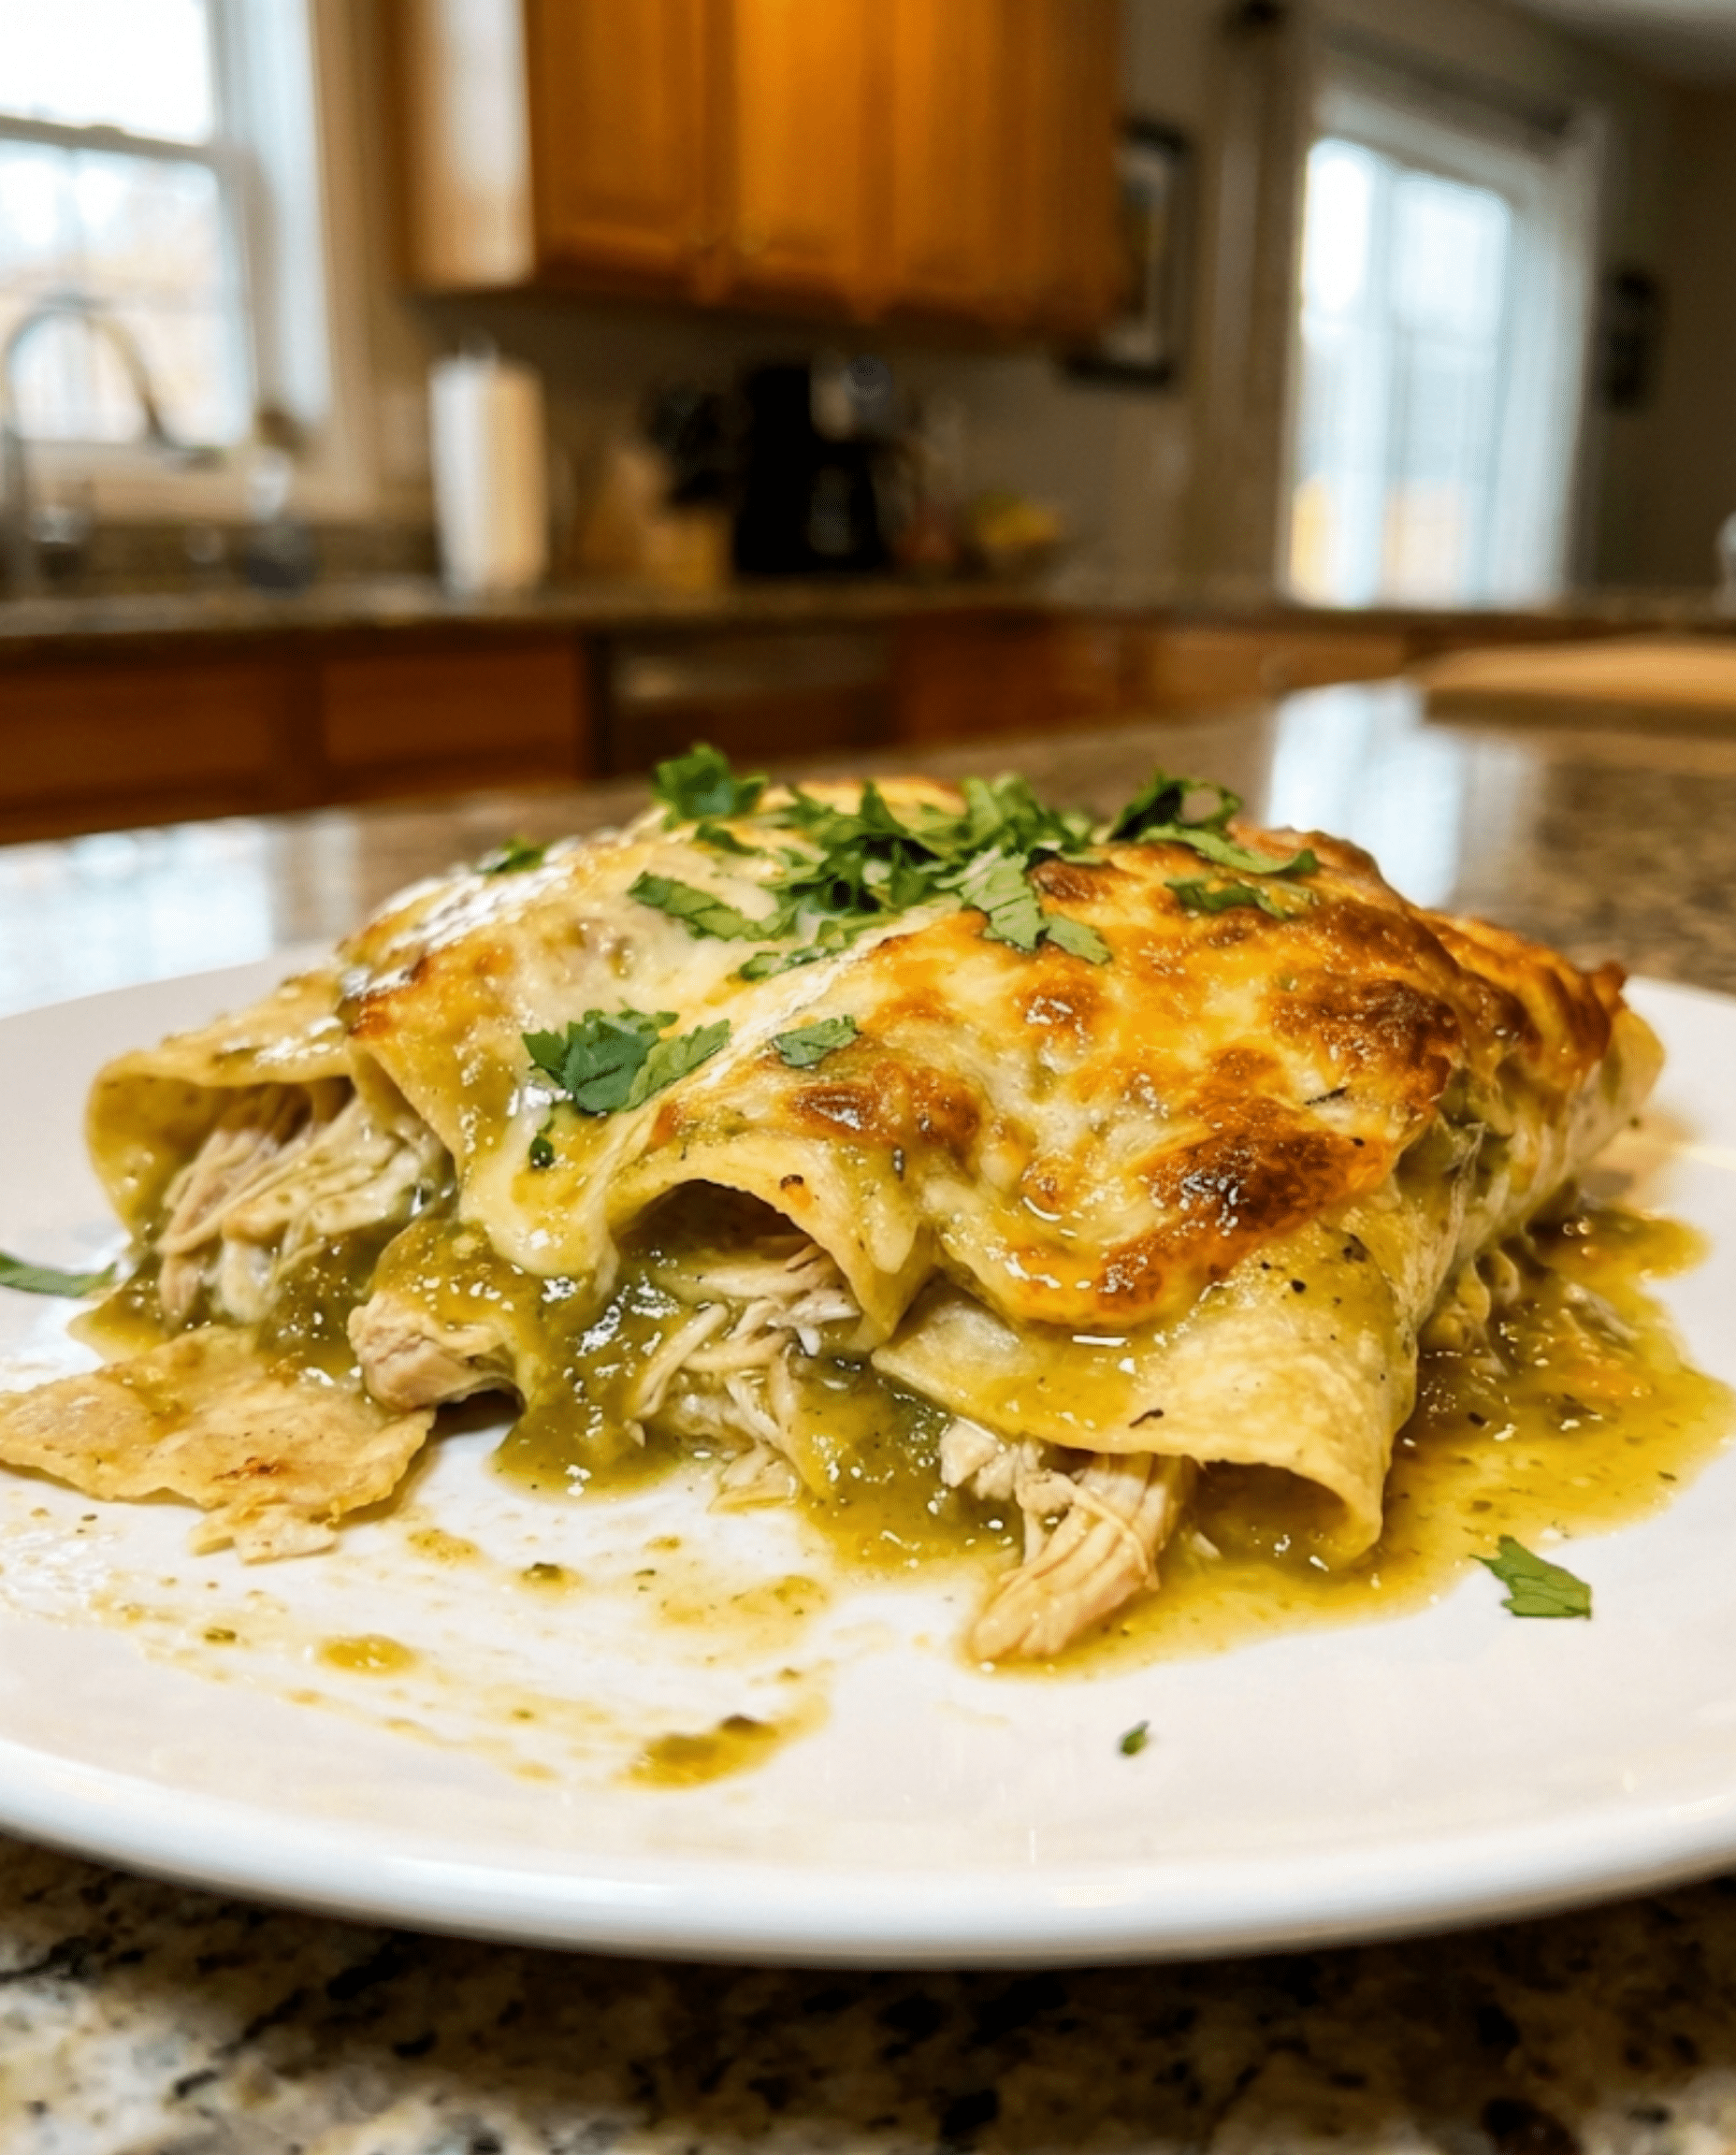
If you’re craving comfort food but want to keep things a little lighter, this bake is a total game-changer. It swaps out heavy cream and sour cream for Greek yogurt, giving you that rich, velvety texture you love with a serious protein boost. It’s messy, cheesy, and exactly the kind of “ugly delicious” dinner my family begs for on busy weeknights—plus, there’s absolutely no rolling required!
Key Takeaways
- Lazy Preparation: We skip the rolling entirely and layer this casserole-style, making it much faster to assemble.
- High Protein: By using Greek yogurt in the sauce and plenty of chicken breast, this meal keeps you full for hours.
- Crowd-Pleaser: It has all the classic flavors of enchiladas—tangy green chiles, cumin, and melty cheese—that kids and adults love.
- Versatile: It’s similar to my chicken enchilada casserole, but with a creamy white sauce twist instead of red sauce.
Why You’ll Love This Greek Yogurt Chicken Enchilada Bake
- The Sauce is Magic: Seriously, the tangy yogurt mixed with green chiles creates a sauce that cuts through the richness of the cheese perfectly.
- No Soggy Tortillas: Because we layer them flat, the corn tortillas soften into the sauce like pasta sheets rather than falling apart.
- Feel-Good Fuel: It’s packed with wholesome, calcium-rich Greek yogurt and lean protein, so you can feel good about going back for seconds.
- Comfort in a Bowl: The way the cheese bubbles and browns on top? Trust me, it’s like a warm hug after a long day.
- Perfect for Meal Prep: It reheats beautifully, making it a lunch option that beats a sad sandwich any day.
- Kid-Friendly: It’s creamy and mild, so even picky eaters who usually shy away from “spicy” food will dig in.
- Flavor Match: If you’re a fan of my easy Southwest chicken wrap, you’re going to be obsessed with these flavors.
Food or Cultural Background
I still remember the first time I tried to make “healthy” enchiladas years ago. I was terrified that swapping sour cream for yogurt would ruin the dish, but I was on a mission to add more protein to our weeknight rotation. The result wasn’t just “edible”—it was incredible. The tang of the yogurt actually mimics the flavor of Mexican crema perfectly!
Growing up, enchilada night was always a production—frying tortillas, rolling them up, and inevitably watching them crack. That’s why I pivoted to this “bake” style. It reminds me of the ease of a Mexican pizza, where you get all those amazing textures without the fuss. This dish captures that authentic green chili flavor I love from my favorite Tex-Mex spots but brings it into the home kitchen in a way that’s realistic for a Tuesday night at 6 PM.
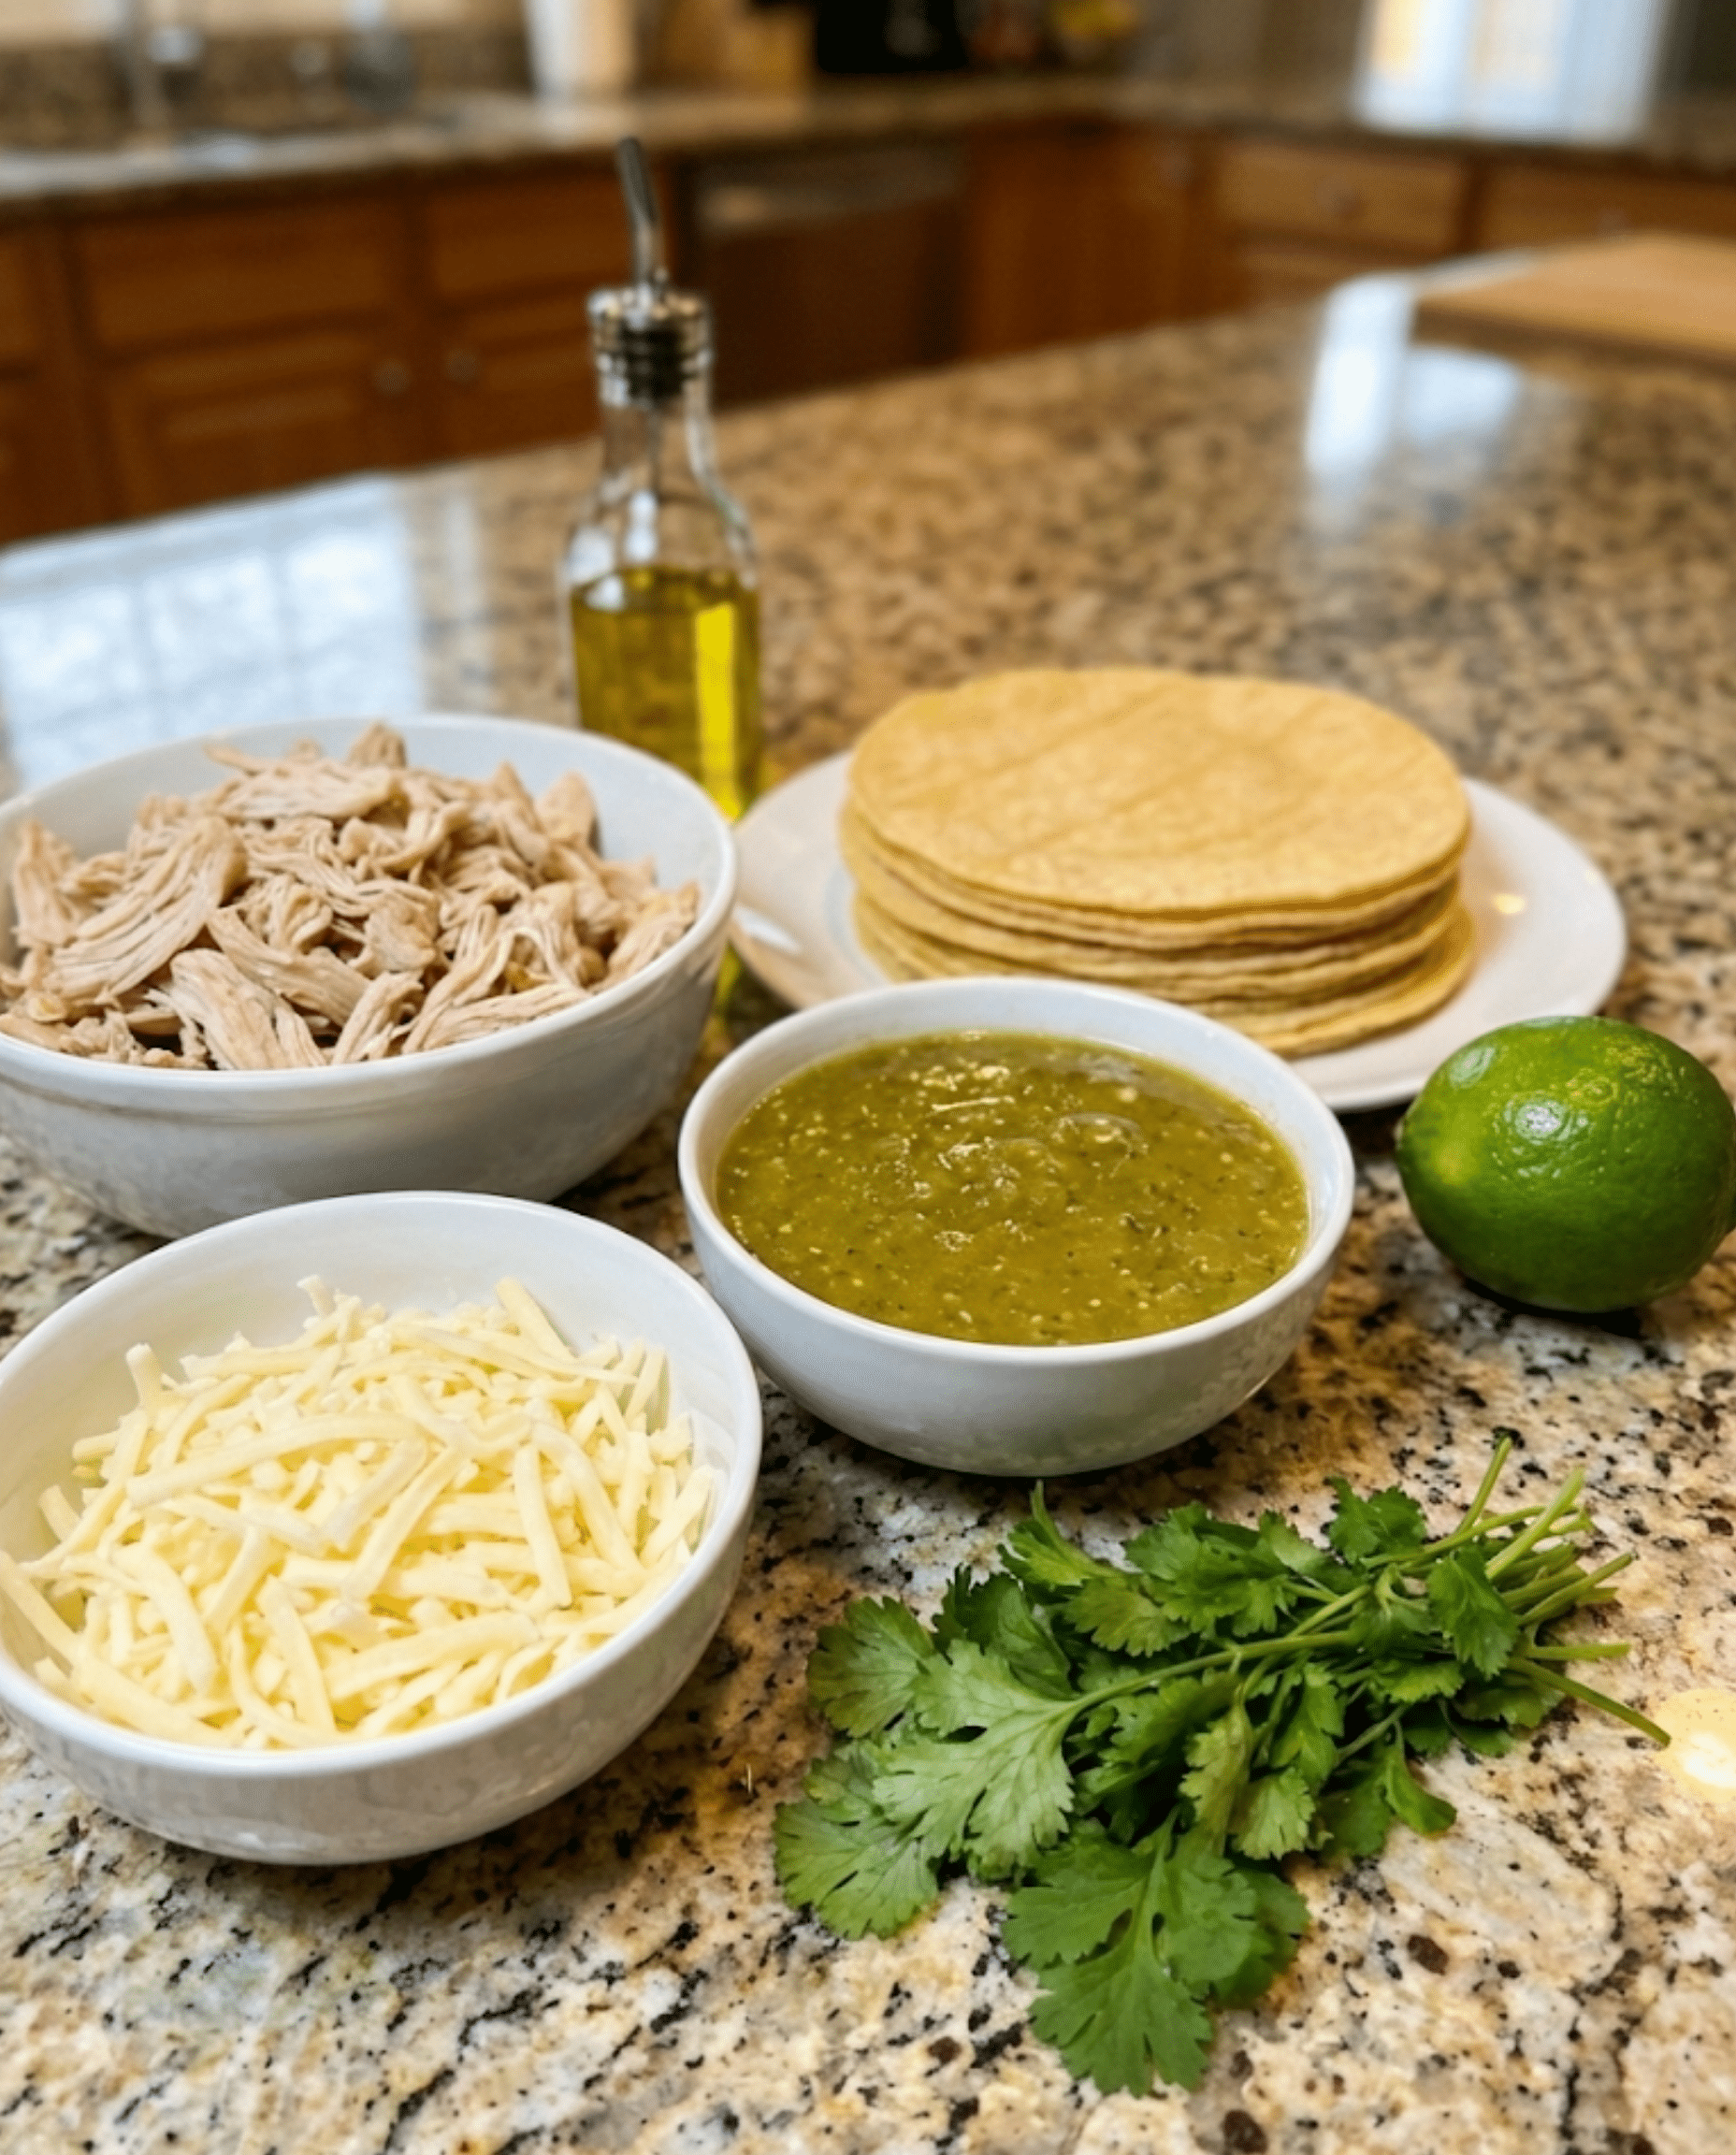
Ingredients for Greek Yogurt Chicken Enchilada Bake
| Ingredient | Notes/Substitutes |
|---|---|
| Chicken Breast | Boneless, skinless. You can also use rotisserie chicken to save time! |
| Greek Yogurt | Must be full-fat (5% or whole milk). Non-fat can curdle or separate in the heat. |
| Green Enchilada Sauce | Mild or medium, depending on your spice tolerance. |
| Diced Green Chiles | Canned mild chiles add texture and flavor without heat. |
| Corn Tortillas | Yellow or white corn works best. Flour tortillas will get too gummy. |
| Cheese | Mexican blend or Monterey Jack melts the best. |
| Spices | Cumin, chili powder, and garlic powder. |
| Cilantro | Fresh is best! If you have the soapy gene, sub with green onions. |
Note: This layering technique is very similar to a homemade lasagna recipe, just with tortillas instead of noodles!
Equipment Needed
- Large Skillet or Pot: For poaching the chicken (unless using rotisserie).
- 9×13 Baking Dish: Glass or ceramic works great.
- Mixing Bowl: For whisking up that creamy sauce.
- Forks: For shredding the chicken.
- Aluminum Foil: Essential for the first half of baking to keep the moisture in.
How to Make Greek Yogurt Chicken Enchilada Bake Step-by-Step
- Cook the Chicken: Place your chicken breasts in a pot with the spices and broth. Bring it to a simmer and cook covered for about 15-20 minutes until tender. Don’t toss that liquid! Reserve 1/4 cup of it—it’s liquid gold for thinning the sauce later. Shred the chicken while it’s warm.
- Preheat & Prep: Get your oven going to 375°F (190°C) and lightly grease your 9×13 baking dish.
- Whisk the Sauce: In a bowl, mix the Greek yogurt, green enchilada sauce, green chiles, cilantro, and spices. Whisk until it’s smooth and creamy. Stir in that reserved cooking liquid to get the perfect consistency.
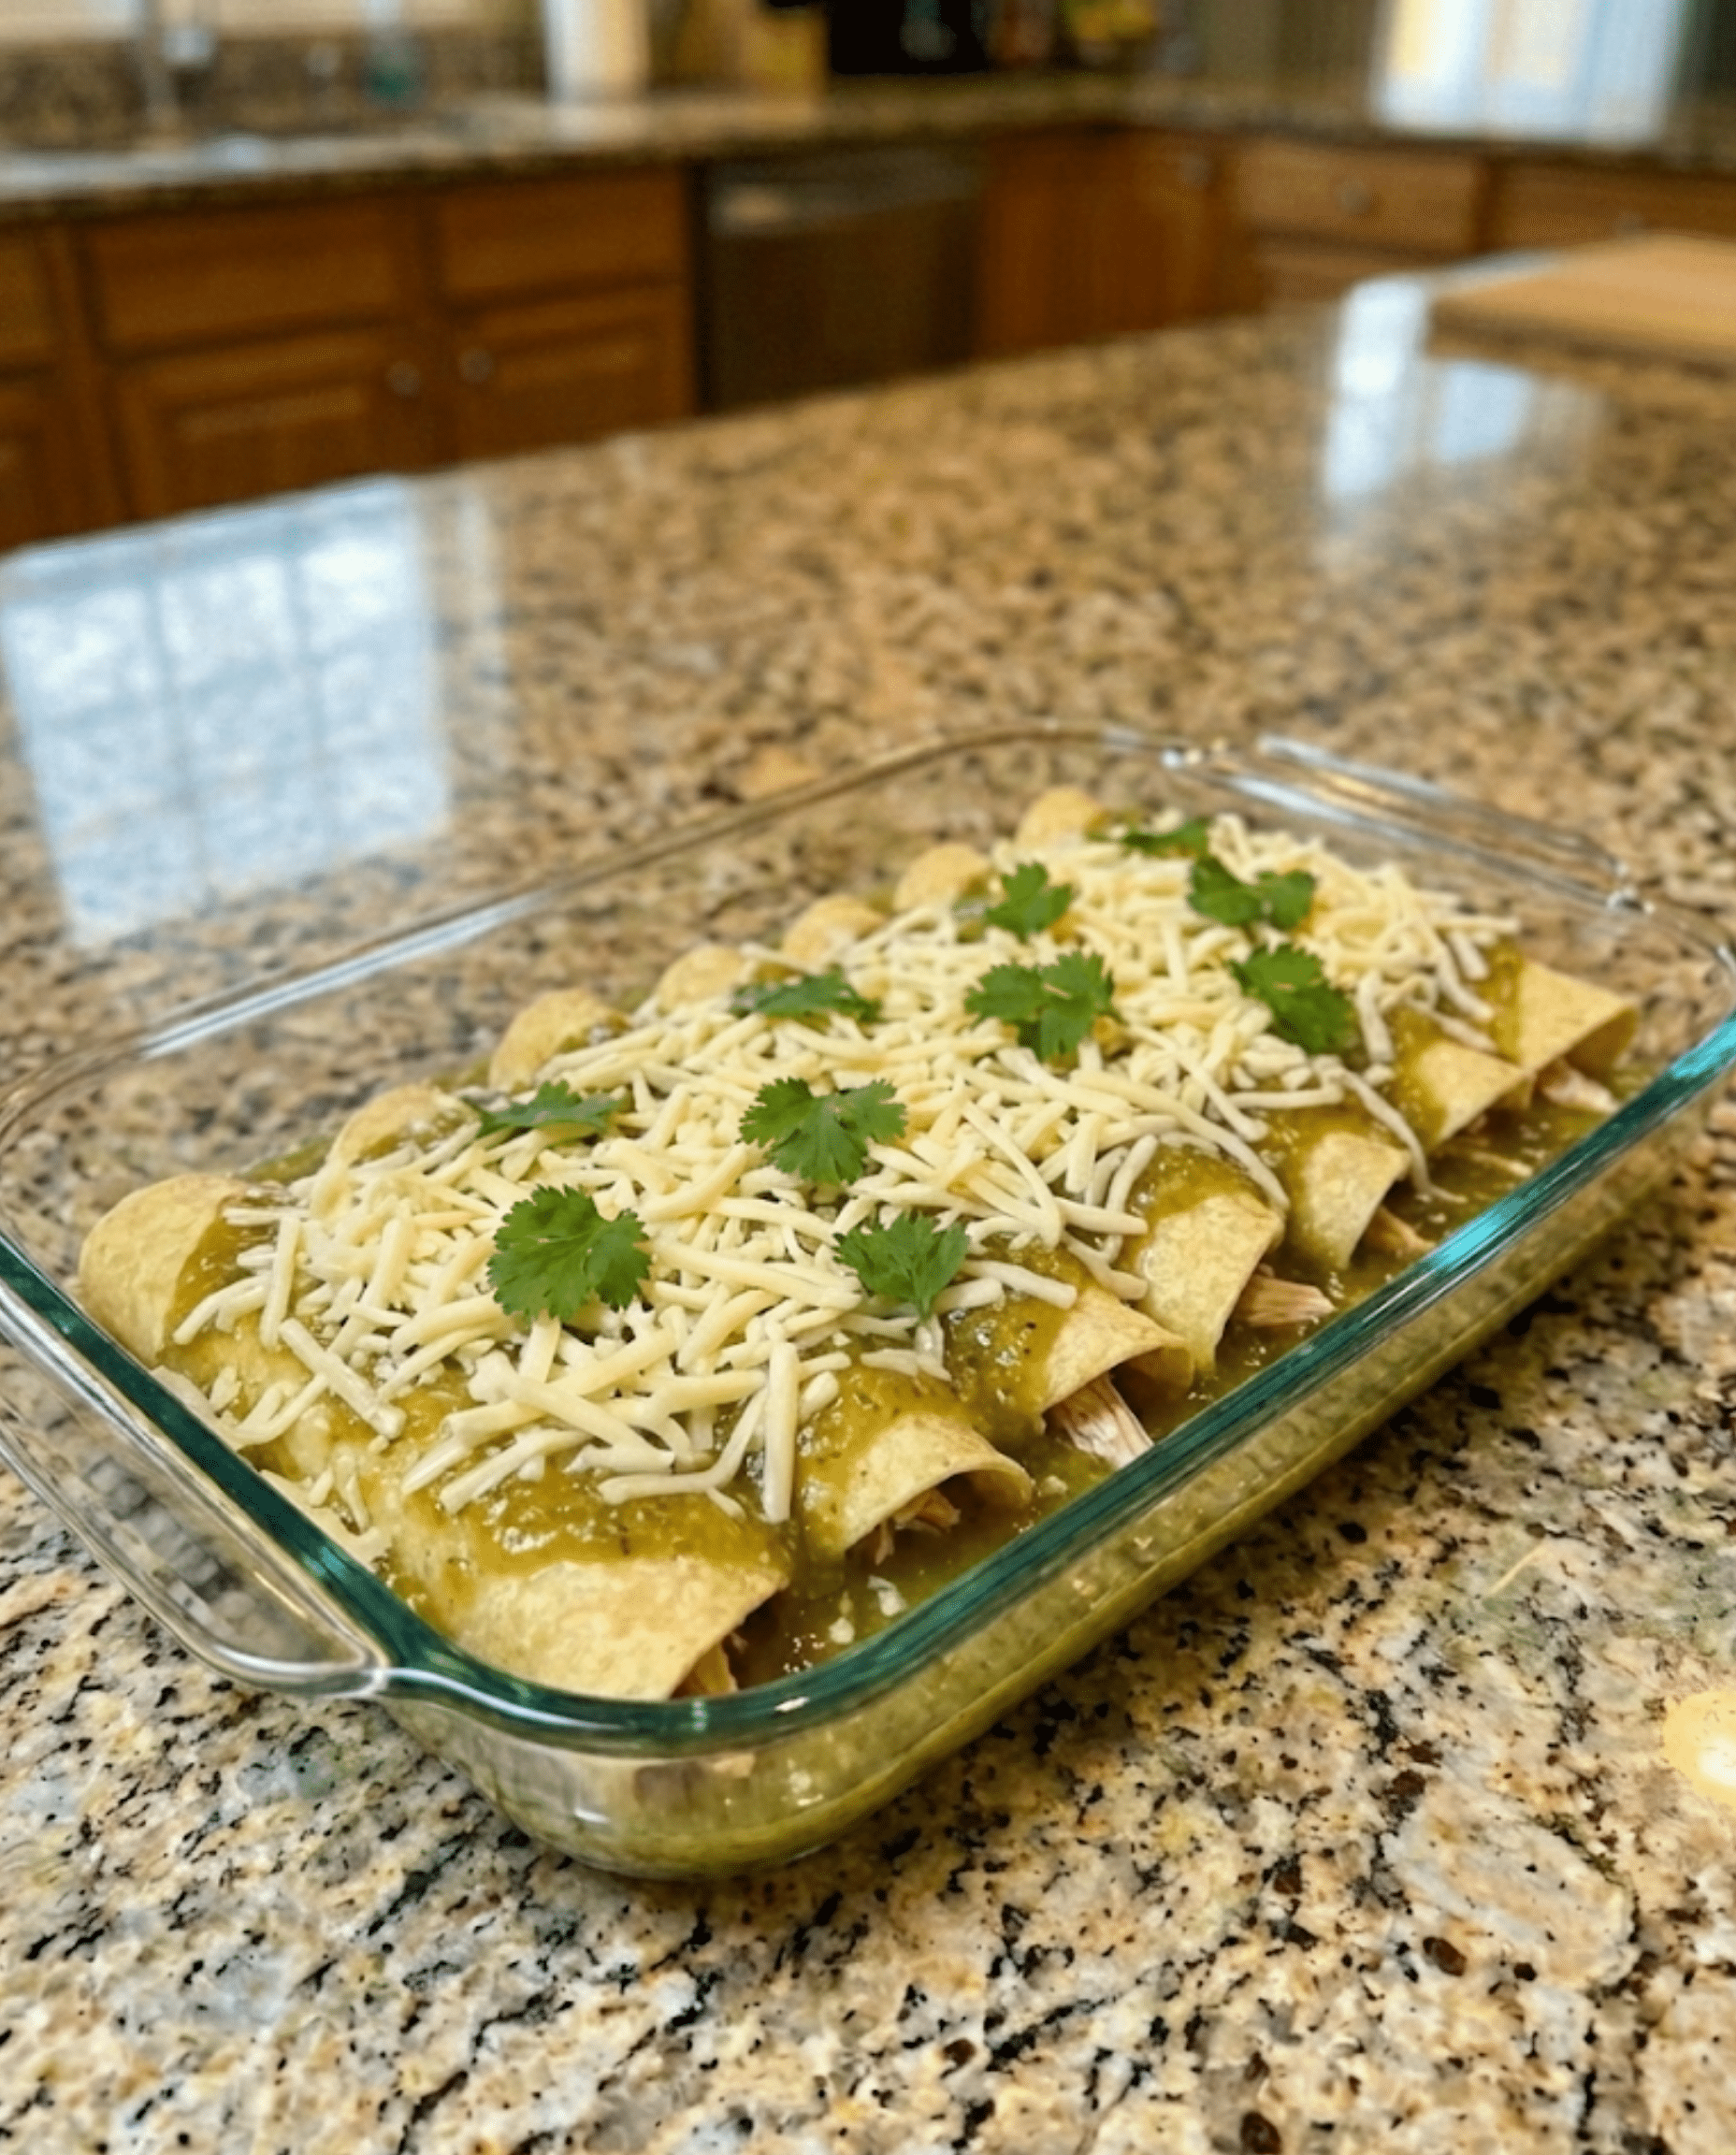
- Base Layer: Spread a little bit of sauce on the bottom of the dish to prevent sticking. Lay down half of your quartered corn tortillas. It doesn’t have to be perfect—overlap them if needed!
- Build the Layers: Top the tortillas with half the chicken, half the remaining sauce, and a cup of cheese. Repeat this layer one more time: tortillas, chicken, sauce, cheese. It’s just as easy as throwing together a dump and bake meatball casserole.
- Bake Covered: Cover the dish tightly with foil and bake for 20 minutes. This steams the tortillas so they get soft.
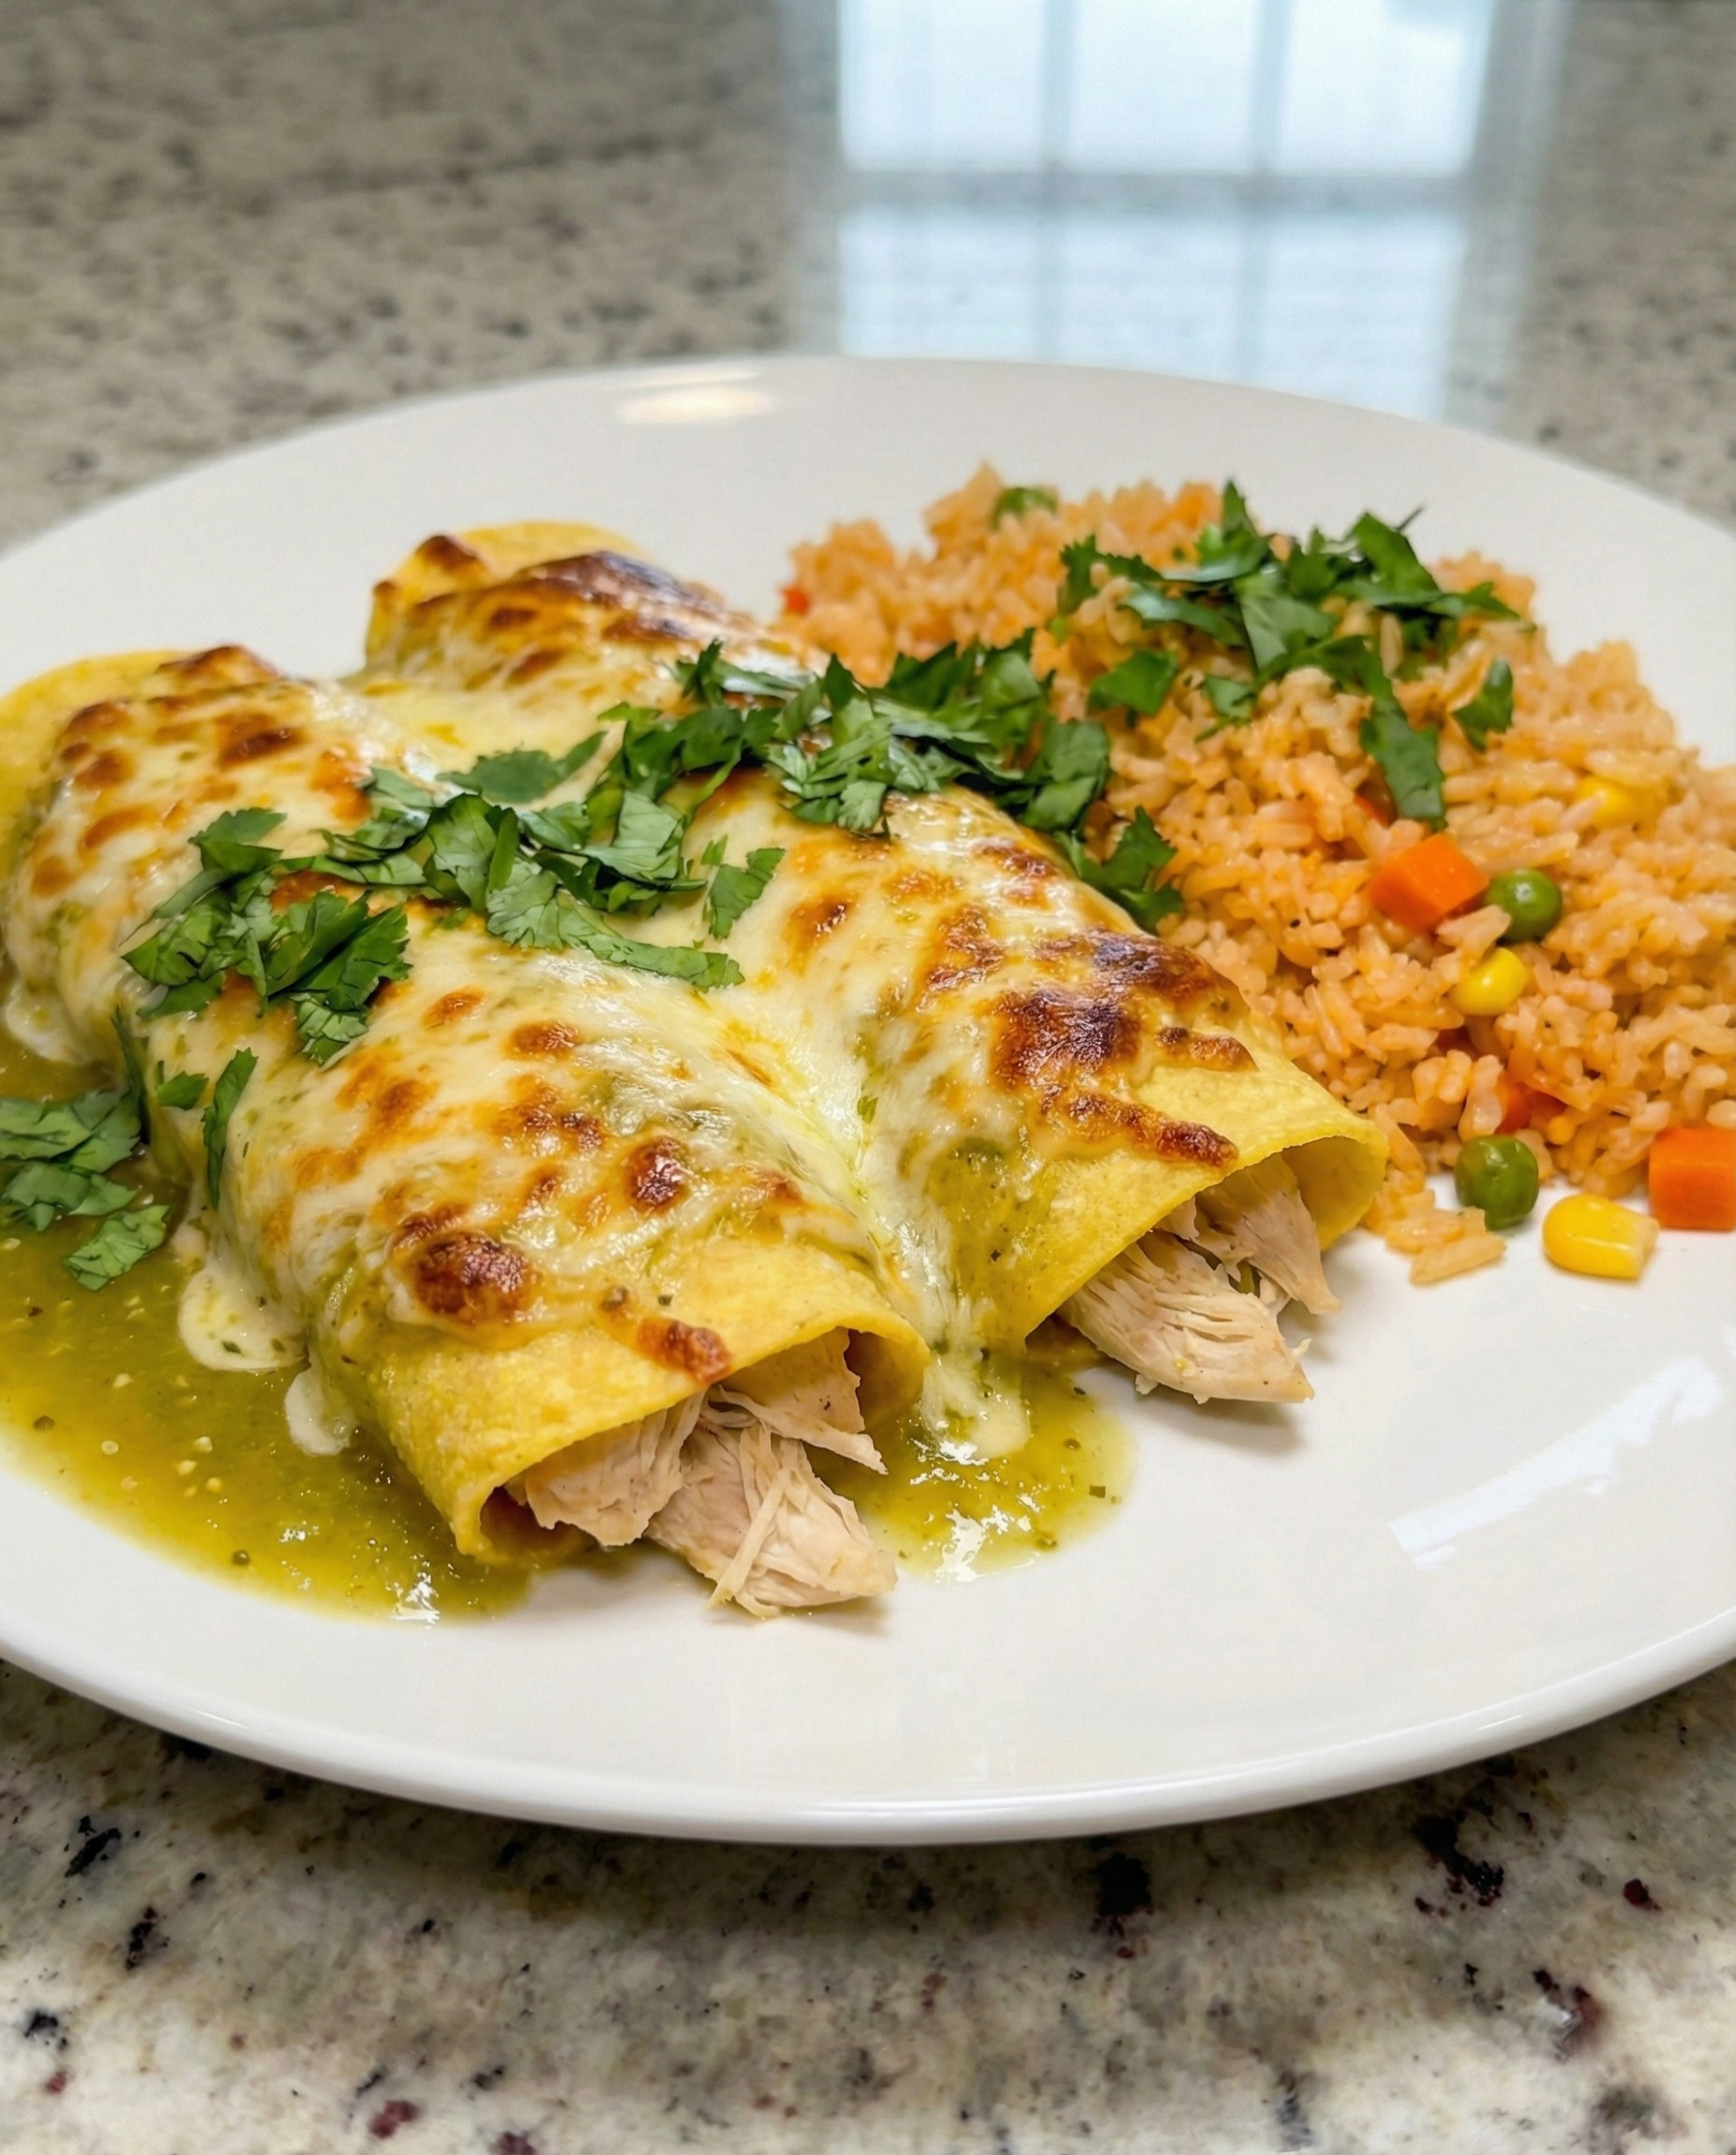
- Bake Uncovered: Remove the foil and bake for another 10-15 minutes. You want the cheese bubbly and slightly browned on the edges.
- Rest & Serve: Let it sit for about 10 minutes before cutting. This helps the sauce set up so it’s not too runny when you scoop it.
Expert Tips for the Best Results
- Don’t Fear the Fat: I cannot stress this enough—use full-fat Greek yogurt. Low-fat or non-fat versions have higher water content and will almost certainly curdle and look grainy when baked. The fat protects the protein structure in the dairy!
- Warm the Tortillas: Even though we aren’t rolling them, I like to wrap my stack of tortillas in a damp paper towel and microwave them for 30 seconds before cutting. It opens up the texture to absorb the sauce better.
- Sauce Consistency: If your sauce feels too thick (Greek yogurt brands vary!), add an extra splash of broth. You want it pourable, similar to the consistency in my creamy chicken garlic pasta recipe.
- Shredding Hack: If you have a stand mixer or a hand mixer, throw the warm cooked chicken in there and mix on low. It shreds the chicken perfectly in seconds!
- Spice it Up: If you like heat, add a diced jalapeño to the chicken while it cooks, or use “Hot” green enchilada sauce.
What to Serve With Greek Yogurt Chicken Enchilada Bake
- Mexican Rice: A side of fluffy, seasoned rice is a must to soak up extra sauce.
- Street Corn: Serve a cup of my creamy Mexican street corn soup as a starter—the flavors pair beautifully.
- Fresh Salad: A crisp romaine salad with avocado and lime vinaigrette cuts through the richness.
- Chips & Dip: You can’t go wrong with chips and a bowl of salsa or guacamole on the table.
Storing and Reheating Tips
- Fridge: Store leftovers in an airtight container in the refrigerator for up to 3-4 days. The tortillas will soften more over time, making it even better the next day!
- Freezer: This is a great freezer meal. Bake it, let it cool completely, then wrap tightly in foil. Freeze for up to 3 months. Thaw overnight in the fridge before reheating.
- Reheating: To reheat, cover with foil and bake at 350°F for about 20 minutes until heated through. The microwave works too, but the oven keeps the texture better.
Nutrition Facts
| Nutrient | Amount per Serving |
|---|---|
| Calories | 385 kcal |
| Protein | 36 g |
| Carbohydrates | 28 g |
| Fat | 14 g |
| Saturated Fat | 7 g |
| Fiber | 3 g |
| Sugar | 4 g |
| Sodium | 620 mg |
Nutrition information is estimated and may vary based on ingredients and cooking methods. Data calculated using USDA FoodData Central standards.
FAQs About Greek Yogurt Chicken Enchilada Bake
Can I use flour tortillas instead?
You can, but the texture will change. Flour tortillas tend to get softer and more dumpling-like in casseroles. Corn tortillas hold their structure better against the moisture of the yogurt sauce. If you use flour, I recommend my easy Southwest chicken wrap tortillas or similar thick styles.
Why did my yogurt sauce curdle?
This usually happens if you use low-fat or non-fat yogurt. The high heat causes the proteins to tighten and separate from the water. Always use full-fat (whole milk) Greek yogurt for baking. Tempering the yogurt with the warm broth also helps prevent this!
Can I use rotisserie chicken?
Absolutely! Using a rotisserie chicken is my favorite shortcut. You’ll need about 3-4 cups of shredded chicken. Since you won’t have the cooking liquid, just use regular chicken broth or water to thin out your sauce in step 3.
Final Thoughts
I really hope this Greek Yogurt Chicken Enchilada Bake makes it into your regular dinner rotation! It’s one of those meals that proves “healthy” swaps don’t have to mean sacrificing flavor or that comforting, cheesy goodness we all love. If you make it, let me know how it turned out! And hey, if you need a little something sweet to finish off the meal, you can never go wrong with a batch of classic chocolate chip cookies.
If you enjoyed this recipe, I’d love for you to join our community! Follow along on Pinterest for daily inspiration and come say hi on Facebook where I share all my latest kitchen experiments. Can’t wait to see you there!
Greek Yogurt Chicken Enchilada Bake
Ingredients
Equipment
Method
- Cook the Chicken: Place chicken breasts in a skillet or pot. Season with cumin, chili powder, garlic powder, salt, and pepper. Add chicken broth. Bring to a simmer, cover, and cook for 15-20 minutes, or until chicken is cooked through (165°F). Shred the chicken using two forks. Reserve ¼ cup of the cooking liquid.
- Preheat Oven: Preheat oven to 375°F (190°C). Lightly grease a 9×13-inch baking dish.
- Make the Sauce: In a medium bowl, whisk together the Greek yogurt, green enchilada sauce, diced green chiles, cilantro, cumin, garlic powder, and salt until smooth. Stir in the reserved ¼ cup chicken cooking liquid to thin slightly.
- Assemble Base: Spread about ½ cup of the sauce evenly on the bottom of the baking dish. Arrange half of the tortilla pieces over the sauce to cover the bottom.
- Layer Ingredients: Top tortillas with half of the shredded chicken, then pour half of the remaining sauce over the chicken. Sprinkle with 1 cup of the cheese. Repeat layers: remaining tortillas, remaining chicken, remaining sauce, and finally the remaining 1 cup of cheese.
- Bake: Cover the dish with foil and bake for 20 minutes. Remove the foil and bake for an additional 10-15 minutes, until the cheese is bubbly and lightly browned.
- Serve: Let the bake rest for 5-10 minutes before serving. Garnish with fresh cilantro and your favorite toppings.
Notes
Tortillas: Briefly warming the corn tortillas in a damp paper towel before cutting helps them absorb sauce better.
Storage: Store leftovers in an airtight container in the fridge for up to 3-4 days.