I’m Karen Colman, and after years of testing in my home kitchen, I can confidently say this is the Classic Waffles Recipe that delivers that perfect balance of crispy edges and an impossibly fluffy interior—trust a home cook to find the simple secret to breakfast perfection!
Jump to Section
Key Takeaways
If you’re scrambling for the perfect weekend breakfast, here’s why this recipe should be your go-to:
- Effortless Perfection: This recipe skips the fussy step of separating and beating egg whites, which means you can whip up the batter in about 10 minutes flat.
- The Golden Ratio: My formula has been perfected for maximum rise and a gorgeous golden-brown color every single time, giving you the best crispy Classic Waffles you’ve ever had!
- A Crowd-Pleaser: It’s super easy to double or even triple, making it a snap to feed your whole family or a house full of friends after they’ve tried my famous stuffed French toast.
- Freezer Friendly: Waffles freeze beautifully! Make a big batch now and pop them in the toaster later for an easy weekday breakfast that beats a store-bought mix any day.
Why You’ll Love This Classic Waffles
Seriously, there’s just something about a homemade waffle that feels like a special occasion. You’re going to fall in love with this recipe because:
- Those Crispy Edges: We’re using a secret trick (more on that later!) to ensure every single square pocket has that satisfying crunch before dissolving into fluff.
- Unbelievable Lightness: They are so much lighter and fluffier than anything you can get out of a box.
- Just the Right Sweetness: The sugar level is spot-on—sweet enough to enjoy plain, but not so sweet that it interferes with your maple syrup.
- A Family Tradition Starter: This is the recipe my kids ask for every single Saturday morning, and trust me, it’s a feel-good, memory-making moment.
- A Healthy Swap Foundation: Waffles are naturally a great foundation for healthy toppings, like Greek yogurt and berries, offering a good base for high-protein breakfast options.
- Buttery, Rich Flavor: We melt the butter and gently mix it in to ensure a rich, homey flavor that makes these waffles taste like they came from a diner.
Food or Cultural Background
You know, the waffle has been around in one form or another for centuries, but for me, this recipe takes me straight back to my grandmother’s kitchen. She didn’t have a fancy Belgian maker; she had a heavy, slightly rickety classic iron that sat right on the counter.
I still remember the aroma of the butter and vanilla wafting through the house—it was a scent that instantly made me feel safe and happy. Grandma Colman’s rule was simple: always keep the batter slightly lumpy and never, ever lift the lid until the steam completely stops! That’s where the magic happens, and that’s the secret to getting that perfect golden brown finish that we strive for in a great classic chocolate chip cookies recipe, too.
This simple, classic style—thin grids, tender interior, and crisp snap—is really what American waffles are all about. It’s comforting, reliable, and tastes like home. This version is my homage to her—a little updated, but with the same heart and soul of that old-fashioned Sunday morning treat.
Ingredients for Classic Waffles
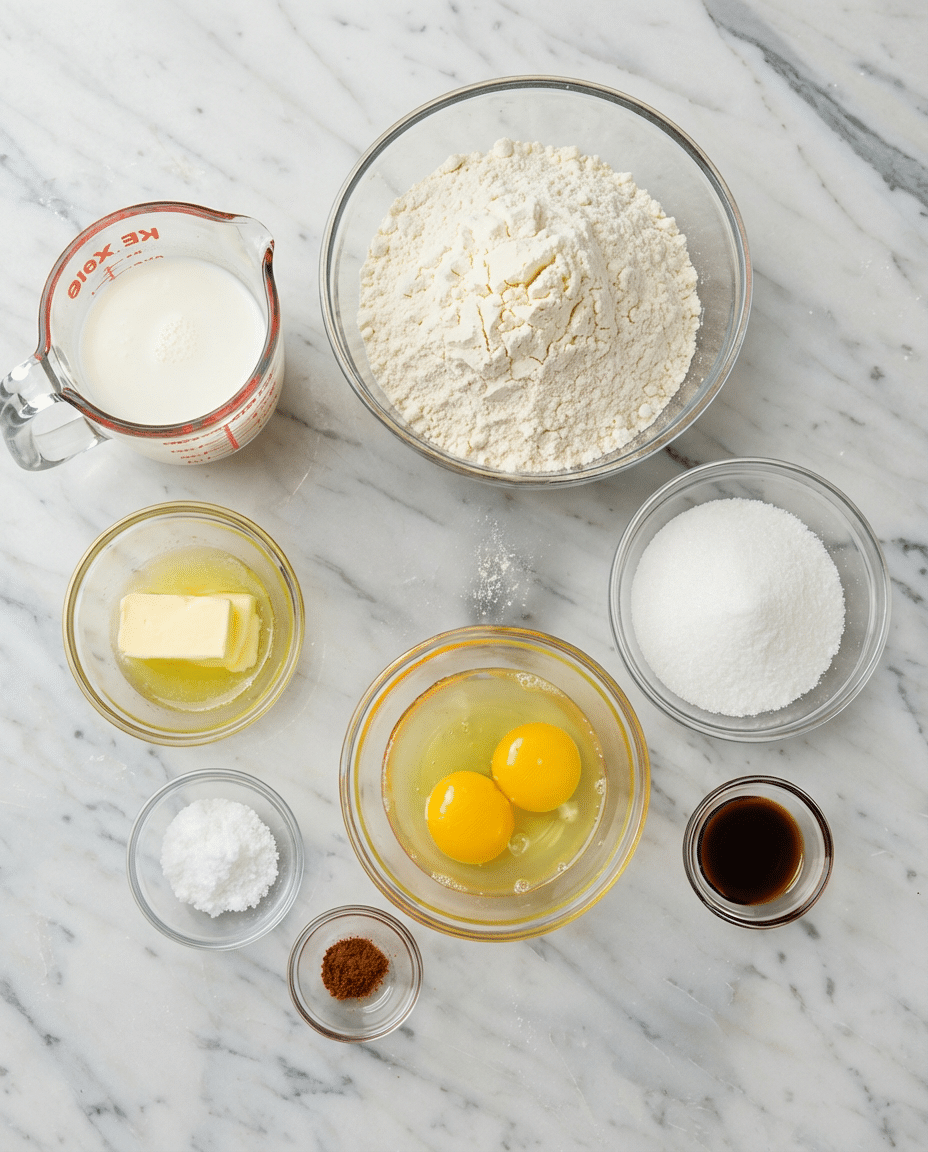
This recipe uses basic pantry ingredients, but the notes are what really make the difference!
| Ingredient | Notes/Substitutes |
| 2 cups All-Purpose Flour | Spoon and level! For a lighter texture, some folks swear by adding 1 tablespoon of cornstarch. |
| 4 tsp Baking Powder | This is your main leavening agent. Do not skip this for proper rise. |
| 2 Tbsp White Sugar | You can adjust this down to 1 tbsp or up to 3 tbsp based on your preference. |
| 1 tsp Salt | Balances the flavor. If using salted butter, reduce this to 21 tsp. |
| 2 large Eggs | Use them at room temperature if you can! They incorporate better. |
| 1 21 cups Milk (warm) | Whole milk or 2% works best. Secret tip: Warm the milk slightly to keep the melted butter from seizing up. |
| 31 cup Unsalted Butter, melted | Butter provides superior flavor. You can substitute with a neutral oil like canola or vegetable oil for more crispy edges. |
| 1 tsp Vanilla Extract | Adds a hint of vanilla extract and a touch of richness. I sometimes use a 21 teaspoon more if I’m feeling decadent. |
Equipment Needed
You don’t need a professional setup—just a few basics!
- Waffle Iron: A classic square or round maker works perfectly. A Belgian maker will give you deeper pockets, but that’s a different vibe!
- Two Large Mixing Bowls
- Whisk (a balloon whisk is best for incorporating air)
- Measuring Cups and Spoons
- Ladle (for scooping batter neatly)
- Wire Cooling Rack: This is crucial! Placing hot waffles on a flat plate makes them steam and get soggy. A wire rack keeps them crisp.
How to Make Classic Waffles Step-by-Step
This is the fastest, easiest, and most reliable way to make the best Classic Waffles Recipe right at home!
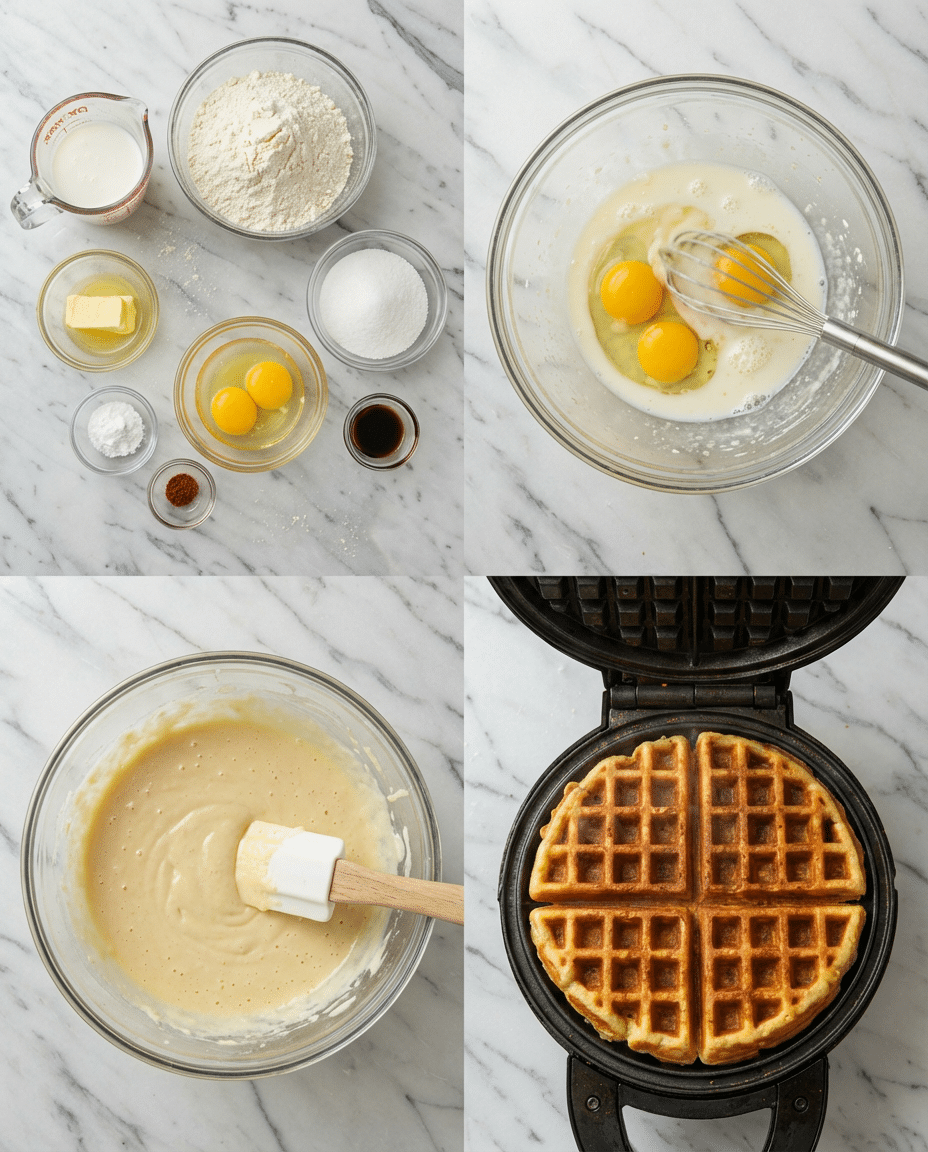
- Prep the Dry Ingredients: Preheat your waffle iron to your desired setting (I suggest medium-high for maximum crispness). Meanwhile, in a large bowl, whisk together the all-purpose flour, baking powder, sugar, and salt. Set aside.
- Melt the Butter and Warm the Milk: In a separate bowl or large measuring cup, melt the butter. Then, stir in the slightly warmed milk and vanilla extract. This ensures the butter stays liquid and blends well.
- Mix the Wet Ingredients: Beat the eggs lightly, then pour the egg mixture into the milk-butter mixture. Whisk until just combined—don’t overdo it.
- Combine Batter: Pour the wet mixture into the dry ingredients. Stir gently with a whisk or rubber spatula until just combined. The batter should still have a few lumps; this prevents over-developing the gluten and guarantees a tender interior.
- Cook the Waffles: Ladle the batter onto your preheated waffle iron. Use the amount recommended by your manufacturer (usually 21 to 43 cup).
- Wait for the Crisp: Close the lid and cook until the steam stops completely, and the waffle is golden brown. This is usually around 4–6 minutes, depending on your iron.
- Serve & Crisp: Remove the finished waffle and immediately transfer it to a wire cooling rack. This allows the steam to escape, locking in that lovely crispness.
Expert Tips for the Best Results
Listen, I’ve made hundreds of waffles, and these little tricks are what separate a good waffle from an amazing one.
- Don’t Overmix the Batter: This is the single biggest mistake people make! A lumpy batter is a happy batter. Overmixing develops the gluten in the flour, which leads to tough, chewy waffles. Stir until the dry ingredients just disappear.
- Always Preheat Your Waffle Iron: You need a hot surface to get that immediate sizzle and crisp exterior. Wait until the “ready” light comes on before you add the batter.
- The Wire Rack is a Game-Changer: Seriously, don’t put a hot waffle on a flat plate. It steams itself and turns immediately soggy. A wire cooling rack keeps the bottom perfectly crisp.
- Try Buttermilk (If You Have It): If you happen to have buttermilk on hand, use it instead of milk! The acid works wonders with the baking powder to create a lighter, fluffier texture, perfect for a moist banana bread-level crumb.
- Rest the Batter (If You Have Time): If you can spare 10 minutes after mixing, let the batter rest. This allows the flour to fully hydrate and the gluten to relax, which improves the texture.
What to Serve With Classic Waffles
Waffles are basically a canvas for anything delicious! Here are my favorite pairings:
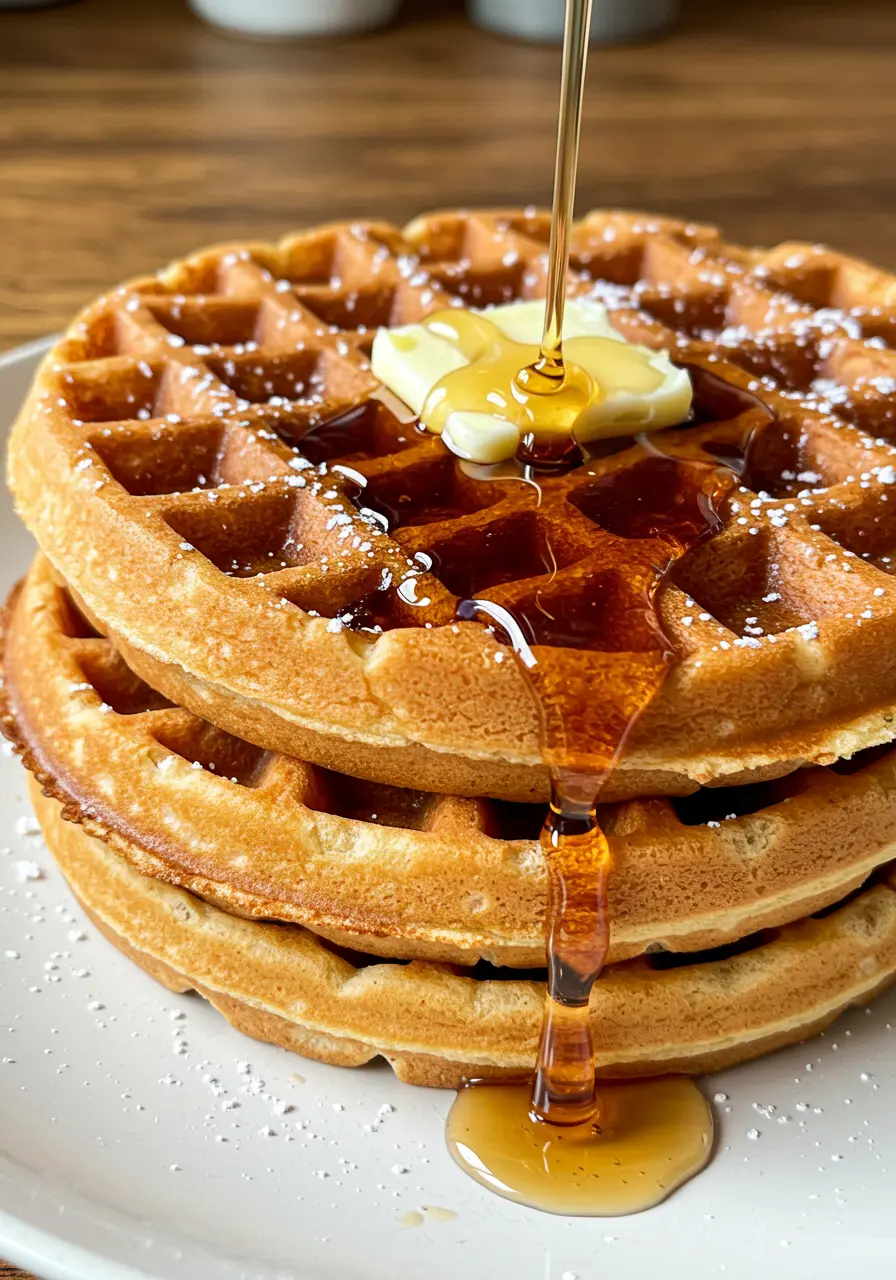
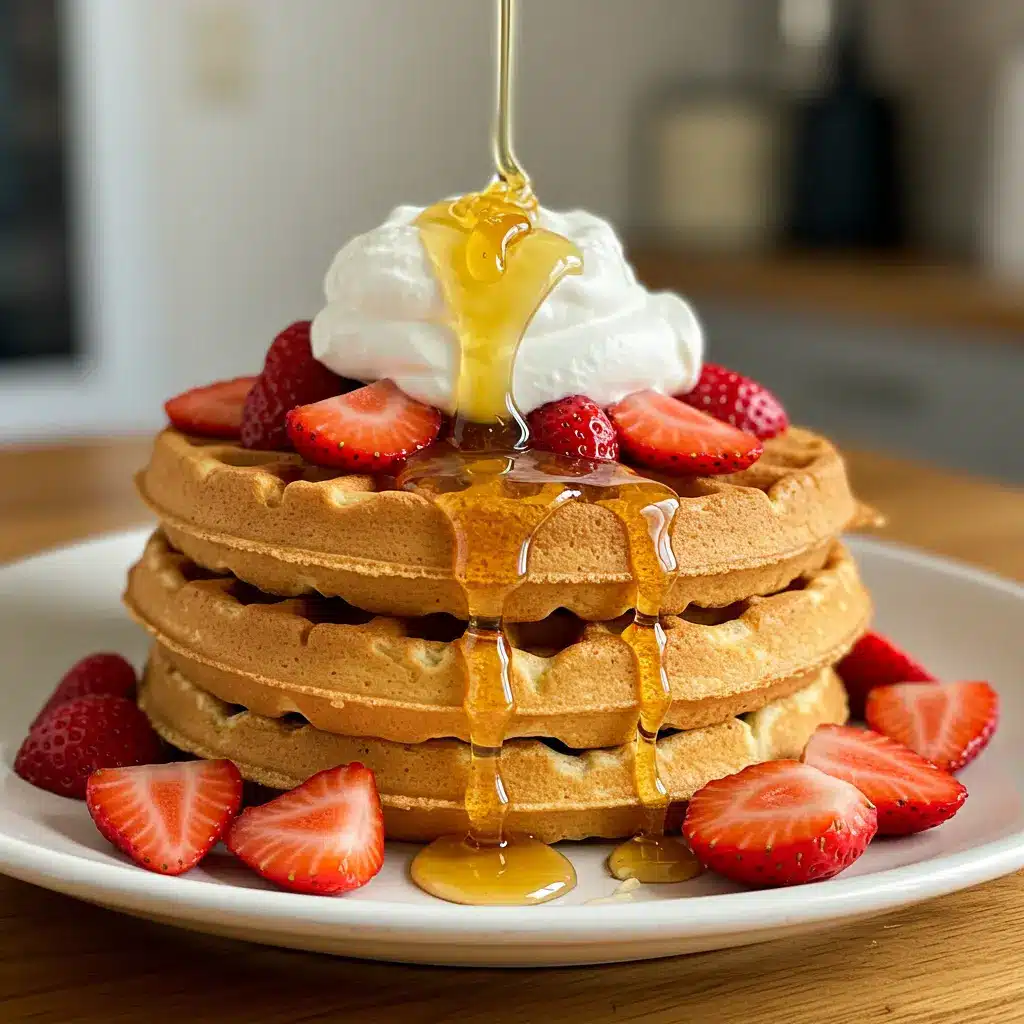
- The Classic Stack: A pat of butter, a drizzle of pure maple syrup, and a dusting of powdered sugar. You can’t beat it.
- Fresh Fruit Compote: A scoop of fresh sliced strawberries and a dollop of whipped cream.
- Savory Swap: Use the waffles as “bread” for a breakfast sandwich! A fried egg, a slice of cheddar, and maybe some bacon.
- Ultimate Brunch Spread: Serve your waffles alongside a decadent easy breakfast casserole for a satisfying weekend brunch.
- Ice Cream Sandwich: Use a leftover waffle as the base for a dessert sandwich with a scoop of vanilla ice cream.
Storing and Reheating Tips
Waffles are excellent for making ahead!
- To Store: Allow waffles to cool completely on a wire rack. Place them in a single layer in a freezer-safe bag or container with parchment paper between them to prevent sticking. Store in the freezer for up to 3 months or the fridge for up to 3 days.
- To Reheat: The best way to revive a cold or frozen waffle is to pop it directly into your toaster or toaster oven until it’s crisp and warm. You can also bake them on a rack at 300°F (150°C) for about 5 minutes.
Nutrition Facts
| Nutrient | Amount Per Serving (Estimated) |
| Calories | 379 kcal |
| Total Fat | 16g |
| Saturated Fat | 9g |
| Cholesterol | 113mg |
| Sodium | 899mg |
| Total Carbohydrate | 48g |
| Dietary Fiber | 1g |
| Total Sugars | 9g |
| Protein | 10g |
Nutrition information is estimated and may vary based on ingredients and cooking methods.
FAQs About Classic Waffles
What is the secret to making good waffles?
The real secret to good Classic Waffles Recipe success is twofold: use melted butter for flavor and don’t overmix your batter (keep it a little lumpy!). This ensures a tender interior and lets the baking powder work its magic for maximum rise and a light texture.
What are waffles made of?
Classic Waffles are made from a simple batter containing all-purpose flour, a leavening agent (usually baking powder), eggs, milk, sugar, salt, and melted butter. It’s essentially a richer, thinner pancake batter designed to cook perfectly in a waffle iron. A note for home bakers: if you have leftover batter, it makes fantastic banana muffins too!
Are waffles healthy or unhealthy?
It depends! The Classic Waffles Recipe uses basic ingredients and is a good source of carbohydrates and protein. You control the health factor by choosing toppings: fresh fruit and a low-sugar syrup are a healthier choice than large amounts of butter and high-fructose corn syrup.
What is the difference between pancakes and waffles?
The main difference is the fat and sugar content: Classic Waffles batter typically contains more fat and sugar than pancakes. This richer batter is essential for creating the crisp exterior and the golden-brown color you get from a great Classic Waffles Recipe.
Final Thoughts
Well, friend, that’s all there is to it! You now have my best-ever Classic Waffles Recipe tucked away in your kitchen arsenal. It’s simple, it’s reliable, and I promise you, that first bite of a warm, crispy waffle fresh off the iron is pure happiness. Don’t forget to Pin this recipe for later, and please let me know in the comments how yours turned out!
Turn meals into memories—join us on Facebook & Pinterest.
Ultimate Classic Waffles Recipe
Ingredients
Method
- Prep Dry Ingredients: Preheat your waffle iron. Whisk together the flour, salt, baking powder, and sugar in a large bowl. Set aside.
- Mix Wet Ingredients: In a separate bowl, melt the butter, then stir in the warm milk and vanilla extract. Beat the eggs lightly and pour them into the liquid mixture. Whisk until just combined.
- Combine Batter: Pour the wet mixture into the dry ingredients. Stir gently with a whisk or rubber spatula until just combined. The batter should be slightly lumpy—do not overmix.
- Cook Waffles: Ladle batter onto the preheated waffle iron. Close the lid and cook until the waffle is golden brown and the steam stops completely (about 4-6 minutes).
- Finish: Immediately transfer the finished waffle to a wire cooling rack to ensure crispness. Serve warm.